Proportional Reasoning – Capture Recapture with Goldfish

IMG_6411You know a lesson is awesome when the Goldfish that the kids get to eat aren’t even their favorite part of the lesson!  I had done the Capture Recapture lesson a few years ago and it didn’t go very well, so I abandoned it.  However, after seeing a video about the concept (thanks to Alisan’s presentation at NCCTM), I decided to revisit it.

I introduced the concept with a question from NRich, then we watched this video on YouTube.  It is imperative that you show your students the video.  If a picture is worth a 1,000 words, a good video can be worth 1,000 explanations.  The video starts with ping pong balls, then moves on to black cabs.  I only showed my student the ping pong portion with my students, and then stopped it before he showed the math.  I had them calculate the estimated number of balls, and then showed them the result.  They were hooked!

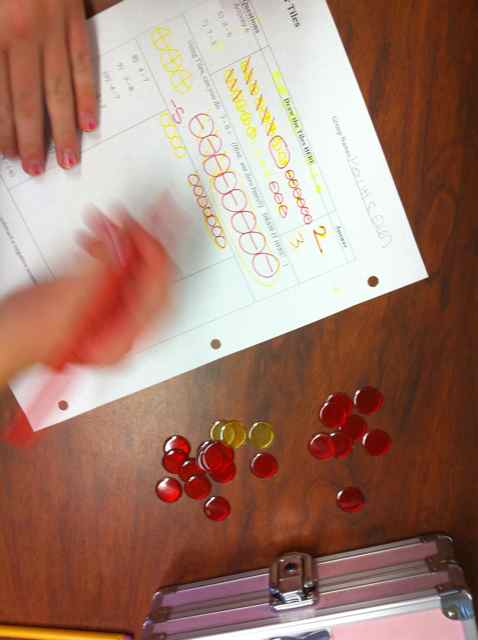
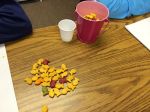
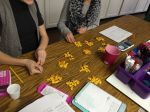
We moved on to Goldfish.  I gave each pair of two their own “pond” full of about 150 yellow Goldfish crackers in a container.  I also gave them a small sample of colored Goldfish in a dixie cup.  I first had them estimate the number of fish in their pond.  I would not let them dump the fish out  for the estimation as biologist do not dump the fish out of the pond.  We then counted the colored fish (our tagged sample) and replaced Goldfish with the tagged colored Goldfish.  I let them eat the fish they replaced.  After mixing the tagged fish into their pond, they took a sample and calculated the proportion.  To have accurate results, we repeated this 4 total times and then took an average.  After they calculated their average, they counted their fish and we compared results.  This was the best part!  They were shocked to see how close their calculated proportions were to the actual number!  Most groups were only off the actual count by 10 or less Goldfish!  I even  had groups come within 1, 2,  and 3 of the actual number of fish in their pond!

Procedure:

  1. Estimate number of Goldfish in pond and record.
  2. Count the number of tagged fish, record.
  3. Replace Goldfish with tagged fish.
  4. Mix tagged fish into pond.
  5. Take a new sample.  Count total sample and tagged fish, record.
  6. Calculate proportion to find estimated number of fish in pond.
  7. Repeat this three more times.
  8. Find an average.
  9. Count actual fish in the pond and compare.

Files:

  1. Pdf – Capture Recapture Data Sheet
  2. Powerpoint – Goldfish Proportions Capture Recapture
  3. Slideshare File (same as ppt, but in slideshare)

Goldfish Capture Recapture Worksheet

Functions New-Tritional Lesson from Mathalicious

I have to give a shout out to Mathalicious lessons right now.  I’m impressed with the way the student sheets are structured.  The directions are very clear and accessible to students so they can get right to work without tons of questions or further explanation from me.  This allows me to walk around and observe so I can see where my students are and help the ones that are struggling.  The questions also progress in the lesson so that students use their previous work to make discoveries.  This is really tough to do when creating lessons.  Kudo guys!

Screen Shot 2013-10-30 at 11.59.14 AMI did the Mathalicious lesson New-tritional with my 7th grade students.  I started with the opening slide and had them notice and wonder for a few minutes to see what they know.  They immediately got that it took 54 minutes of running to burn off the 550 calories in a Big Mac.  After watching the video, we talked about the preview questions (which I love btw)!  What factors affect how many calories we burn, how many calories do they think are in a big mac meal, and how long do they think LaBron would have to play to burn off that whole meal (if he had actually gotten to eat it)?

We then did Act 1.  I stressed UNITS!!  My lesson focus was functions, not decimals so I let them use calculators.  If I did this lesson in 6th, my focus would have been decimals and I would have them calculate it by hand.  Even with the calculator students said, “There has to be a quicker way to do this.”  FORESHADOWING!

IMG_6079A great discussion about the commutative property of multiplication came up in question 3 as students multiplied in different orders and got the same answer.  Then, I went back to their “easier way” remark and gave them two minutes on my timer to silently think of a better way to do all of this work.  After two minutes they shared their strategies with each other and then we discussed them.  I had listened in (Five Practices) and picked groups of students to go in order from least to most algebraic.  Rounding the cal/min was a suggestion by a couple of students.  But others pointed out that is wasn’t very accurate.  Several students wanted to graph it, and finally, a few even said that we could write a function.  Bingo.

So, as they suggested, we started with a graph on Desmos.  We entered the weight, and then the cal/min of the activity.  In the 2nd class, instead of entering (125, 7.875) in the Desmos table,  125, (125)(0.063) so they could see the pattern without me having to re-write it on the board.  After entering in all of the basketball data, I connected the dots.  Of course they wanted to extend the line, but could not from just the table.  They knew they needed a function so I gave them two more minutes of silent time to just LOOK at the table and see if they discovered the pattern.  No lie, almost every student was able to write the function, for the win!

Screen Shot 2013-10-30 at 12.25.56 PM

When I typed the function in and the red line drew on top of our line segment there were gasps in the room.  Oh, how I love it when these magical moments happen in math class!  We then use the weights of student volunteers to see how many calories per minute they burned playing basketball.  We found it on the graph, but then I created a table from the function and they loved that even more!

IMG_6081The question “How many calories do you burn just sitting?” came up and another student exclaimed, “IT’S ON THE BACK!!”  A student commented that he didn’t even burn ONE calorie per minute by sitting!  Which made another student ask, “How much would you have to weigh to burn one calorie a minute sitting?”  I had them write the “sitting” function  f(w) = 0.009w.  Then, I wrote f(w)=1.  So that 1 = 0.009w and we just solved for w, then check the answer in our graph.  I love it when a week comes together this way!!

Bonus – Student Remarks:

  • That picture isn’t real food.  McDonalds has an artist make food sculptures that they photograph.  (Really? I had no idea)
  • Who is that old guy? (Larry Bird)
  • Oh yeah! I thought it was Clinton too! (After telling them of Elizabeth’s students.)
  • I bet LaBron burns more calories per minute than that playing basketball since this is an average.
  • How many calories do you burn sleeping (volleyball, jumping on the trampoline…)?
  • How many calories do you burn just sitting – OMG, It’s on the back!
  • How many calories do you burn thinking.
  • Thinking? That’s JUST sitting.

Thanks again Mathalicious for a great day!

Our “Official” Lesson Plans for Observation

Click here to submit your MS Sunday Funday post!

#msSunFun

Next week:  How do you help students in your class that are behind in math?

Please share your “official” lesson plans that you used when being observed this week.

Discovering Negative Numbers

Today I had a three hour Math Boot Camp where I reviewed basics and exposed new to our school students to math topics that our current students have already been taught.  I do not expect them to grasp these topics in one day.  But, it is great exposure for them and I get to see where they are mathematically so I can more accurately plan for these students this fall.  Again, this is exposure, not a full blown lesson.

One of the main topics today was the discussion of negative numbers.  Kids have such a hard time with this because they are taught so many “rules”.  Man, I hate rules kids have to memorize for math.  Today several kids even told me some of the rules they had learned, but didn’t know what they meant and could not apply them.  I actually prefer this to kids that just apply these rules because I can wipe the slate clean and start fresh with them.

I started with the idea of a negative number, showed them patterns so they could discover the answer, and then moved to a number line.  I also frequently referred back to the “concept” of a negative number often and pull finances in at every opportunity.  I mean seriously, what kid doesn’t understand simple money spending?  (As in, I want this awesome xbox game that cost $50, but I only have $30.  My Mom buys it for me and now I owe her $20, thus -20).

To introduce them to the idea of negative numbers, I asked them to represent (on a whiteboard) numbers for the scenarios that I gave them.  You received $45, 15 degrees below zero, you owe 27 dollars and 62 cents (decimals too), the depth of the titanic and the height of skydivers.  I told them they have been using negative numbers for a long time and didn’t even know it.

Then I moved on to patterns. The patterns I used were very simple and kids even laughed when we went through them.  This stuff is TOO easy and they loved that.  They got to see negative numbers come out and they were excited that they discovered the pattern.

  • 4 – 1 =
  • 4 – 2 =
  • 4 – 3 =
  • 4 – 4 =
  • 4 – 5 =
  • 4 – 6 =

After this I modeled subtraction on the number line, always bringing in parallels to money.  Then, I moved on to more patterns.

  • 4 – 2 =
  • 4 – 1 =
  • 4 – 0 =
  • 4 – (-1) =
  • 4 – (-2) =
  • 4 – (-3)=

This was a brief introduction today.  I am going to add more discovery and the need for working with numbers like -4 – 5  =  for an in-class lesson.  I didn’t hit them with multiplication and division of negative numbers as I didn’t want to confuse them.

After all of our pattern work today, one kid even said, “My IQ just doubled today.”  Did I mention how much I LOVE 6th graders?

I hate saying, “Subtraction of a negative”.  Or “minus” a negative for 4 – (-3).  What does everyone else say?  And how are you all teaching negative numbers?  I would love more ideas and discussion.

Kinesthetic Activity – Human Box and Whisk-ers Plot

I emphasized that there are 5 syllables so you need 5 points.  I had the students hold up their fists and then count off with their fingers while saying, Box and Whis-kers Plot over and over, and over.

After going over vocabulary and doing some easy examples, I had the students access their own measurement data located in our Google Spreadsheet.  My students always care more (and remember more) about anything if it has something to do with them.

We have two sections of 6th grade.  For homework I assigned the students to make TWO box and whiskers, one for each section of the class.

The next day in class I put students plots up on the Elmo to compare the heights of each class. They love showcasing their work and comparing the two sections.

We then did a kinesthetic activity by making a human box and whiskers plot.

  1. I had all of the students line up from shortest to tallest.
  2. I asked then what points we plotted first (extremes) and had those student step forward.
  3. Then, we found the median and had that student step forward.
  4. I asked the shorter end, “Who are you?” and they yelled, “The lower set of data!” and then we found the lower quartile and had that student step forward.  I did the same thing with the upper quartile.

In one class the numbers worked out and we did not have to average any two students to find the quartiles.  In the other class, it did not, so we had two students stand in a line.  We joked that we added them up and split them into two.  (“I’ll stand on your head.  No, you can stand on my head!”)  It was fun!

Students enjoyed the human box and whiskers plot.  They got to move around plus it was very visual.  With the numbers taken out, I feel like some students really understood what was going on instead of just marking off numbers looking for the median.

Next year… I am going to use something (yarn maybe?) so we can actually “box” the students into their quartiles and make the whiskers.  I could also cut out construction paper “dots” for the students who step forward to hold.  This would also be a cute instructional iMovie starring the students.

Cutting Out the Pythagorean Theorem

I taught the Pythagorean Theorem to my 7th graders earlier in the year using a variety of methods.  I wanted them to not only see but experience and even touch the theorem.  However, the activities did not go as well as planned.  As easy as it seemed to show them how this beautiful theorem worked, it was much harder in practice.  Middle school students are very visual.  And, unless instructions are explicitly clear, they can easily veer off course.  This is not their fault, and in fact is one of the most endearing things about middle school students.  They are really just so excited about learning that they often dive right in and usually leap before they look!

When I tried to do this activity with my 7th grade instructions went awry, and my students were confused instead of enlightened.  So, I learned from my mistakes, and decided to try again with 6th grade.  But this time, I created a visually precise Powerpoint presentation for the 6th graders to follow.  I let them draw, color, cut, and glue.  They were engaged, they were able to follow along, and they understood!  This activity gave me multitudes of the infamous “light bulb” gasps that I crave!   Since I did this activity, I just remind them of the area of the squares when they incorrectly make the hypotenuse a leg length, and they get it.

  • Required Materials:  Centimeter graph paper and scissors.  I cut the graph paper in half (hamburger) to conserve paper.
  • Suggested:  Colored pencils or markers and a glue stick*.
The night before the activity have them read about the Pythagorean Theorem in their book.  Have them write down the definition, the diagram, and the formula in their notes.  In class the next day, have one student read the definition from their book.  Ask them what they think about it.  When they say, “What in the world does that mean?” and “That sounds like Chinese!”, tell them, “No, it’s GREEK!” and then start the Powerpoint.  Color and cut with them, then sit back and bask in the “light bulb” gasps!
* I had them glue the 25 on and then glue the whole thing in their Geometry Booklets.

Negative Numbers!

I am teaching negative numbers to my 6th grade class.  Most of them have either never worked with operations on signed numbers or have only worked with them briefly.  As soon as I brought it up, many students groaned.  When I inquired about the groans they told me, “Oh – I HATE those!”  and “I just don’t GET them.”  A few students however were happy to offer up the “rules” that they had memorized.  Unfortunately, the pretest I had given showed that even those students were not computing the signed numbers correctly.

I basically had a blank slate.  So, I decided to start from scratch and introduce signed numbers using red and yellow integer circles.  I made a worksheet where they progressed through the following problems.

  • addition of numbers
  • addition of negative numbers
  • SUMMARY
  • subtraction of numbers
  • zero pairs
  • subtraction of negative numbers
  • SUMMARY

I had them draw the circles on their papers and even encouraged them to use red and yellow markers.  The loved it and understood it all!  Until we came to subtraction of negative numbers like  4 – (-3).  For some reason, this concept really gets kids.  Even with the circles in front of them, they want to make this problem 4 + (-3).  It happens over and over again.  In my past experience it is misunderstood by so many that I honestly thought about teaching multiplication and division of signed numbers first and then just saying, “You are just distributing a -1!”  But, my conscience would not let me.  I wanted them to really SEE it!   So, I plugged on, showing them how if you have four yellow circle (+) and you put three red circle (-) down to cancel and get 1 circle then you DON’T have 4 – ( -3), you have 4 + (-3).  At this point, I heard many “lightbulb” moments throughout the room.

We also went outside and drew number lines with chalk on the sidewalk and then “walked” the problems.  They actually walked out how a subtraction of a negative ends up adding.  They really seemed to get it.

Before class was over I did a three question “quick check” and did not let them use the circles (but they could draw them).  The questions were…

1.   -3 + (-4)

2.   5 – 7

3.   5 – (-6)

Everyone in the entire class got number one right.  Only two kids missed number two.  But, over half of the class missed number 3!  The most common incorrect answer was -11 !!

In summary, I think that the chips were almost a success as they now get everything but “subtraction” of negative numbers. Almost isn’t good enough however.  And, I don’t want to just tell them the rule and have them compute it.  I want them to understand it and to know it.  But, I feel like they have done so much work with this (two days) and are still lost on this concept.

Maybe I am expecting too much too soon.  I have not taught this grade level before.  Is this such a new and foreign concept to them that it just takes a while to absorb and a lot of practice to be able to calculate this sort of problem?  Will they eventually get it or must I insist on them getting it now.

UPDATE:  FOR NEXT YEAR:

I don’t know about you guys, but my brains works fiendishly at night while I sleep.  I wake up in the morning refreshed and with new ideas churning (especially if I am thinking of an issue (or blog about it) right before I go to bed.  So, here is what I am going to try next year.

Day One – Addition and subtraction of numbers, excluding subtraction of negative numbers.  I am going to use three models.

  • circles
  • money (thanks Cathy!)
  • “walking” the numberline

I want them to be very secure in this concept and to UNDERSTAND that 3 + (-4) is the SAME thing as 3 – 4.  To strengthen this I am going to draw the circles on the board and have THEM make up the equations, then have different people write their equations on the board.  The kids will see how the different equations mean the same thing.  I may have them make up money stories as well for this.

DAY TWO:  Subtraction of Negatives

For the warm-up I will review yesterday and introduce zero pairs.  Then, I am going to START with the number line (or the money), or both.  I will then move to modeling with the circles.  THEN I am going to have them write the equations for the ones that I model.  Finally, I am going to insist that they re-write 8 – (-2) = 8 + 2, over and over again.  I want to spend an entire day on this because they seem to really get everything else, but this throws them!

If you have any comments, suggestions, or great ways you conveyed this to students I would really appreciate it!

First Two Weeks in Middle School!

6th
Week 1

  • Measured each other!
  • Exponents, including negative exponents and scientific notation (Powers of 10 Video was a big hit)
  • Learned how to submit onto a Google Form for my Homework Data survey

Week 2

  • Order of Operations (GEMS)
  • Properties (they loved THE CLAW)
  • Turning WORDS into MATH

7th

Week 1

  • Growth – measured each other
  • Evaluating Algebraic expressions
  • Evaluating Algebraic expressions
  • Properties

Week 2

  • Integer Operations
  • One and Two step equations (showed them Hands On Equations)
  • Population Density