One-Sheets Are Back!

We just finished our first chapter in Algebra 2.  This means that we also just did our first “One-Sheet” Study Guides!

  1.  I provided them with a list of the 6 main topics of this chapter.
  2. They brainstormed in groups about what should go under each topic, using their notes and book.
  3. They folded a brightly colored piece of paper into 6 sections and label each section with the topic.
  4. Gallery Walk – They walked around the room and examined each other’s boards to see it there was something great they wanted to include on their sheet that wasn’t on THEIR board.
  5. I take pictures that I post so students can go back and read the boards if they would like.

Brainstorming with their teams

Gallery Walk of the finished boards

Creating the One-Sheet

IMG_1737

Creating the One-Sheet from their boards

SeeSaw – Student Generated Help Videos

As an educator, there is nothing I love more than awesome professional development.  My school recently held “Mini-Conferences”, given by our teachers, for our teachers.  We were able to go to two mini-conferences.  I attended Standards Based Grading and SeeSaw.  Both conferences were great, and actually reminded me of Twitter Math Camp, professional development by teachers, for teachers.

img_9365I had not heard of SeeSaw before, but it sounded amazing.  SeeSaw is a digital portfolio that students can access from their phones, iPads, or a computer.  Students can take pictures or videos on their phone (iPad or computer) and then instantly upload it to the app.  They can also add links, files, notes, or annotate anything on the app.  Once something is uploaded, the whole class can see it in a “Facebook” like live feed.  Students can like and comment on uploads.  Students don’t even need to sign in, which is great for younger students.  Once they download the app, they can just scan the provided QR code and they are instantly in.

img_9364I was doing a Station review of Functions the day after the professional development and decided that I had t incorporate SeeSaw.  After a great suggestion by Julia Finnyfrock, I decided to have each student video themselves explaining just one problem on the review we were working on.  I told students that I wanted them to look over all of the problems in the review (or the previous review homework) and pick one they wanted to work on.  While working, they could ask me for help.
After completing their problem, they checked their answer with me.  Then, they created and uploaded video explaining how to do their problem.  I created a folder for each station, so that it would be easier for students to find problem they needed to see.

I loved using SeeSaw because if a student needs help during station work, they can watch a video until I have time to come over and help them.  Also, they can watch the videos when they are working or reviewing at home.  A great benefit is also for absent students.  I uploaded the worksheet with solutions from the review and even a one-sheet that we created in class.  All of the work for the review, including work we did in class, was all in one place.  They can watch their peers explaining problems they missed in class.

I encouraged, but did not require all students to make a video.  I wanted my students to do what they needed to do for their review.  Some students did not want to create a video, and some students created more than one!

Here is a glimpse of what students see in the SeeSaw feed.  When they click on the folder, they can see all of the videos that relate to that folder.

Teaching Students How to Study with One-Sheets

I would love for my students to learn how to prepare for a math test. This one-sheet idea is the closest I’ve come, as they (eventually) do it all on their own.

At the end of last year I had my students create a study guide for their final exam. I had them make one page (or notecard) of notes for each chapter we had studied. My students commented that although they liked the idea, this was difficult to do at the end of the year. They wish we had summarized each chapter while we were in the chapter so they could remember more things to put on their sheets.  My best ideas often come from students.

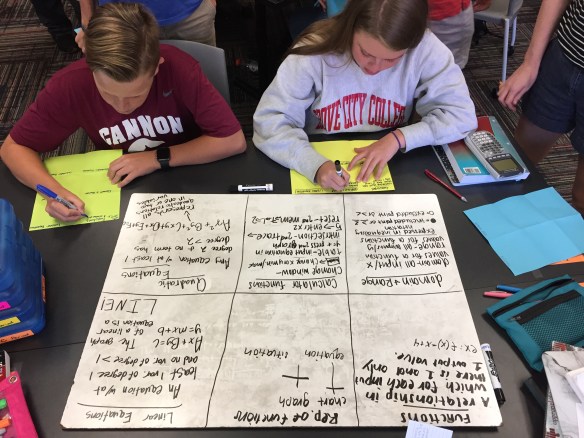
So this year at the end of every chapter I had my students summarize the most important topics on the front of one sheet of paper.  Since this was new for them, I gave them a list of topics, then had them brainstorm in groups on whiteboard. Afterwards I had them fold one sheet of paper into sections (one section per topic), and then write the information on their sheets.  I encouraged them to include homework problems they had difficulty on, and notes from the in-class review.

As you can see from the picture above, some students created really thorough one-sheets, while others barely wrote the basics. To help model great one-sheets, I shared the most detailed ones with the class.  But this was after the fact and didn’t help students who had not made thorough one-sheets.


In the end of year survey, most students mentioned how much they loved the one-sheets. But several students mentioned that while they liked having one-sheets, they did not enjoy making them (or make helpful ones).  And that they would love help making a great one sheet.  After reading their comments, I talked to them in class about how to help them create better one-sheets. Overall, more of my boys mentioned that they struggled with making helpful one-sheets.  They suggested that we make the actual one-sheets together in class, especially at the beginning of the year when they are just learning how to make them (and before they realize how valuable the one-sheets will be).

So next year this is how I plan on introducing one sheets.  The first time we do one-sheets, we will make the entire one-sheet together as a class.

  1. Give students a list of topics and let them brainstorm together on whiteboards.
  2. Instruct then how to fold the sheet into sections and label each section.
  3. Give them class time to fill in the sections, guiding them about what is important to include and modeling how to organize the material.
  4. Share great examples as I see them in class so other students can add that information to their sheets.
  5. Finish the one-sheet in class (instead of taking it home to finish).

As the year progresses and they get more practice making the one sheets, we will do less in class.  I want them to learn how to make the one-sheets on their own so they will have this skill for future classes.  However, I will make sure to give them class time at the end of every unit to start making their one-sheets.

About halfway through the year my students became upset with me when I didn’t have them make a one sheet for a chapter.  Some students did it on their own but they missed the class time to brainstorm and work on it together.  By the end of the year most students were creating incredibly detailed one-sheets.  Seriously, some of these one sheets were a work of ART.

Screen Shot 2016-05-20 at 6.29.42 PM

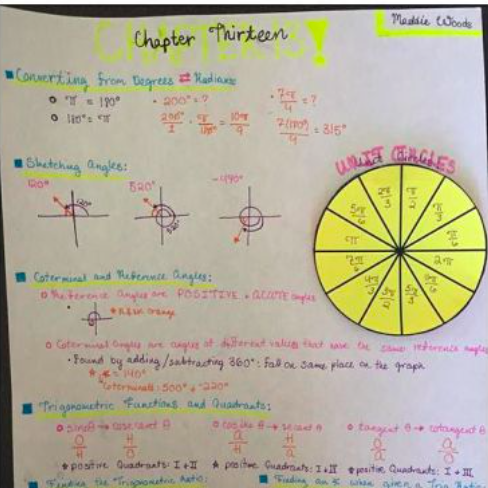
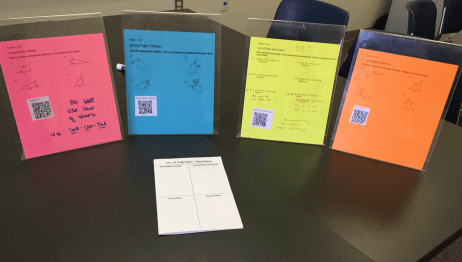
Here are some of the white-boards and one-sheets that my students created this year:
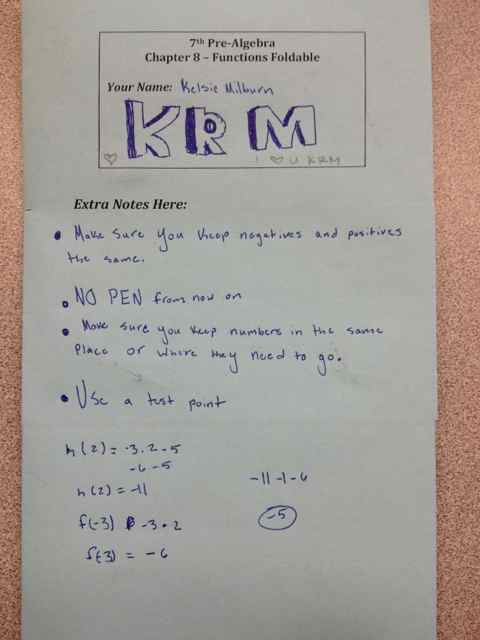


Trigonometry Stations

I’m so excited to start trig again in Algebra 2!  We have a week long trig blitz where we review the trig ratios, inverses, special right triangles, and law of sines and cosines.  Some students needed more one on one review than others. Stations.jpg.png
So I decided to do a station activity to review the week.  I love station activities, as everyone can work at their own pace, check their answers as they work, and get one on one help from me when they need it.  Plus, they get to work individually and with other students and move around.  I created booklets for them to do the work for each station.  My students make one sheets at the end of each unit, so I put a blank one sheet template on the front of the booklet.  This way, they could take extra notes as they worked the problems.  It was pretty much a perfect teaching day!

Since they have studied all of these topics previously in Geometry, I wanted to push them a bit.  We did the ambiguous case (ASS) last year with the Law of Sines.  However this year, after the pre-calc teacher told me about using the law of cosines with an ASS triangle, I pushed my students to try it!  Some of them preferred the law of sines, but many saw the benefit to using the law of cosines.

This year I introduced the law of cosines as an alternate (and optional) challenge.  But next year, I am going to have them all use the law of sines to find a missing side of a 2 triangle ASS in order to frustrate them enough to BEG for a better way.  I will do this as a group activity on the large white boards so they can fuss with each other about how crazy the problem in, then I will sneak around to the groups and quietly suggest a better way.  Oh, teaching math can be so much fun!

Here are the stations I used.  I created QR codes that sent the students to the answer sheets.  Then I taped the codes to each station so students could check their answers as they went along.  And here is the booklet.  I wish I could do this everyday.


Video Tutorial Project – A Student Favorite

Lights, camera, action!

Screen Shot 2014-01-13 at 9.11.50 PM

Every now and then I have my students watch an explanation (teaching) video online.  I sometimes do this as a review when I’m beginning a topic that they have studied before.  They always hate it.  They always complain.  So, I rarely assign them teaching videos to watch.  They really hated the last one I assigned.  Their complaining gave me the idea to have THEM make their own teaching videos – and to do it better!

The Video Tutorial Project took a week of class time (and that included watching everyone’s videos one day in class).  However, I did not give them a review day or a test for this unit, so it was only about 3 extra days.  In their written reflections, it was clear that my students LOVED this project.  And, their videos were impressive.  They were creative in their presentations and even added transitions, music, and even special effects.  My favorite video was a take off of Vi Hart’s videos.  There is no way I could have made a video this good, ever!

Screen Shot 2014-01-13 at 9.10.03 PM

I partnered the students into groups of 2, and let them pick their topic from our current unit.  They had to state and define their topic, then show three clearly worked out examples, increasing in level of difficulty with each example.  They could make the video anyway they wanted.  They all had to upload their video to YouTube.

I created a project planning Google document for them to follow, and distributed it using Doctopus.  I had them create the three examples problems for homework one evening and submit them on a GDoc form.  That way, I could check to make sure their examples were sufficient.  In class the next day, they made any necessary corrections and planned their video.  They had the next three days to record and edit their video (if they chose to edit it).  I gave no other homework this week so that students would have time to work at home on it if needed.

Watch all of their Video Tutorials Here

This project was worth the time invested and I will definitely do it again.  The students loved it (see their responses below).  We had a few challenges that I would like to address before assigning this again.  One was finding quiet places to record on campus (it was freezing that week so it was not very comfortable outside).  Another challenge was the partner issue.  Students could only work together at school because this was a partner project.  Also, the video editing (if they use iMovie) always falls on the shoulders of one of the partners, which I don’t like.  I have thought about having each student make their own video tutorial, but they have so much more fun working together.  Also, in their reflections all of my students but TWO would rather work with a partner.  They also would have liked more time, but they always tell me that.  They would work on a project for a month if I let them.  They are awesome.

Student Thoughts:  What did you like the BEST about the project?

  • I felt like it really helped me even because watching the video helped understand the concept better.
  • How we could add our own interesting twist.
  • The part about how you could add in a challenge problem.
  • I loved how you can create a tutorial in so many ways, like white board or like V Hart.
  • working with a partner how creative we got to be
  • THE FREEDOM
  • it was fun
  • All of it!!!
  • having fun with my friend
  • Recording 😀
  • The fact that we could put what we wanted into the video
  • Getting to use my tablet to draw math.
  • We had alot of freedom to make it however we wanted and everyone had a different video.
  • I thought it was very creative.
  • filming
  • working with partner
  • that we got to make a video
  • Working on whiteboards and working
  • partner work
  • Probably putting it all together
  • That is wasn’t just an ordinary project.
  • The filming part.
  • the creative freedom was fun
  • the filming
  • The recording
  • It was awesome to just be able to go out on our own and make our own tutorial.


Study Guide Kit for Math Tests

I teach 6th and 7th graders.  For most of them, 6th grade is the first time they have ever had to study for any test, much less a math test!  To help them along, I created two things for my students, a “How to Study for a Math Test” checklist and a “Math Test Study Guide” foldable.

  1. Laminate the checklist and then have them create a pocket in their graph notebook to keep it in (so they hopefully don’t lose it).
  2. Assign the study guide for homework a couple of days before the test (it becomes a foldable).
  3. Foldable – Have them fold the study guide and glue it into their notebook once they are completely finished filling it out.  They can decorate the cover if they like.
  4. Have in class and work time math help where we use their completed study guides.

This helps me help them!

This slideshow requires JavaScript.

For future tests I only have to print out the study guide.


Smarties for My Smarties – After School Math Help Incentives

Once a week I offer after school math help for each subject.  After school math help is great because it’s a small group so I can focus on exactly what each student needs.  Students come to after school help if they have been absent and want to catch up (very needed in winter months), If they would like help on the current topic, or if they would like to do their homework with me.

Unfortunately, after an 8 hour school day, no one is very excited about after school math help.  In fact, I think I heard someone say, “Dreading it.”  So, I decided to spice it up a bit for the students (and myself) by adding a bit of after school sweets to after school help.  I figured if they decided to come to after school help, they deserved a little sweet treat!  Each student that comes to after school help gets a roll or smarties and a tootsie roll.  This may not sound like much, but it’s a fun treat at the end of a long day (and the beginning of 45 minutes of math).  The little bit of sugar gives us all just the edge we need to help our brains make it through 45 more minutes of learning.  But, it does more, with the addition of some music, a little candy makes it a lot of fun!  Today my fabulous 6th graders even talked me into a bonus – one single smartie for every question they answered correctly.  I had a blast with them, and they even came up with a cute slogan, “Smarties for Smarties.”

After school help today was FUN, the students were awesome, and I’m really looking forward to spending more Wednesdays with my amazing 6th grade Smarties.

Update:  Today when I came into class this was on the board.  I’m just happy to know that my students enjoyed it too.  🙂

All about SLOPE Foldable

Yes, I am loving some foldables right now!  The kids love them too.  They get to cut, glue, hi-light, and write in little boxes.  Plus, when they are studying, they can just flip up and look at one concept at a time so they are not overwhelmed with an entire worksheet.  Nirvana.

I am coming up with them for review now, but next year I would like to introduce them when we initially take notes.  Then, the students could take the notes right on the foldable and not have to recreate (read – waste time) writing everything again in review.  This will leave more time for working on math problems in class – using the foldable as a guide of course!

Again, printing is the only tricky part to make sure it lines up well.  I also had the students put a small strip of glue behind the words “I can find Slope from” so it would have a sturdy header and flip better.

6th Slope Foldable – Editable Word File

6th-slope-foldable – PDF


Foldable for Functions and Graphing (Graphic Organizer)

Our Functions chapter is full of great information that I would love my students to remember – even more than usual!  I created this Graphic Organizer in the form of a foldable.  It is stuffed full of information including…

  1. NAGS – the four ways to represent a linear equation.  Numerical/analytical, Algebraic equation, Graph, Sentence.  (Thanks @pamjwilson for this idea!)
  2. Functions – Function notation, Domain, Range, Vertical line test.
  3. GRAPHING – Three ways to graph, Table, y=mx+b, using intercepts
  4. Slope – words, formulas, parallel, and perpendicular slopes
  5. Inequalities – Graphing inequalities in two variable.  Dotted line vs. shaded line, test point.

On the back I put a place for their name and extra notes.  The notes section was a new addition to this type of foldable for me and one of my favorite parts!

I go over the graphic organizer in class, giving them examples to work for most of the sections.  After we were finished, I had them turn the graphic organizer over and write notes on the back.  I suggested that they could take notes of things they wanted to remember, or about the topics they felt they needed to focus on when studying.  It was good to do this after the review because what they were unclear about was fresh in their heads.  I then had a few students share what they wrote.  This was helpful to other students.  Some of them wrote extra items as other students read their notes out in class.

I had much higher than usual scores on this test (and more students scoring higher as well).  Considering that this is one of our more difficult topics of the year, I feel that this foldable really helped the students!

Note:  I did not include how to write linear equations because my students are solid in this area.  We added examples when we went over this in class.

To use:  This is a double sided foldable.  You will need to print both side, being sure to line the correct word up with the inside when you print it out.  Students will need to only fold the outside two flaps and then cut on the dotted lines.

File to print out:  7th Chapter 8 Review Foldable – Graphing PDF  or one you can edit from Box.