Plickers aka “Can We Do This All Period?”

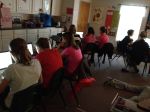
If you want 100% of your students engaged and asking you to do an activity, you need to try Plickers.

photoThe amazing Pam Wilson introduced us to them at Twitter Math Camp.  We were ALL amazed and impressed!

Screen Shot 2014-10-04 at 12.55.49 PM

Screen Shot 2014-10-04 at 12.51.23 PM

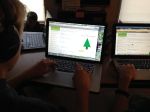
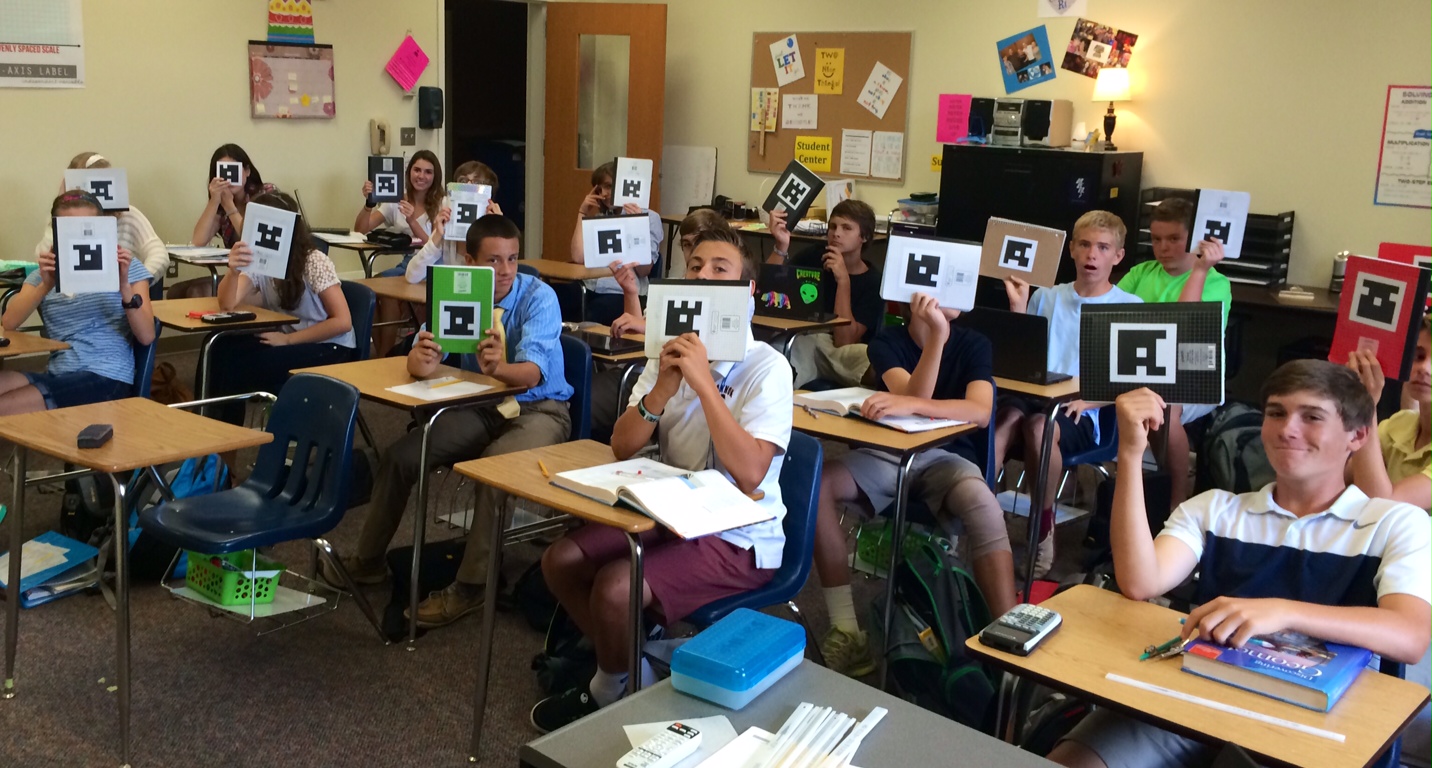
A Plicker is a “paper clicker” with a bar code that the students hold up and then you scan with any smartphone or iPad.  Only one device needed, no batteries required!  The students can pick A, B, C, D or True/False.  The data immediately shows up on your phone AND on their website as a bar graph.  I assigned my students a number, so I can even see who missed the question as I am scanning the room.

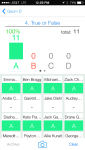
From your computer, you can project their responses onto your overhead.  It only shows the correct responses in the “Live View”.

Screen Shot 2014-10-04 at 1.08.27 PM

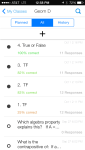
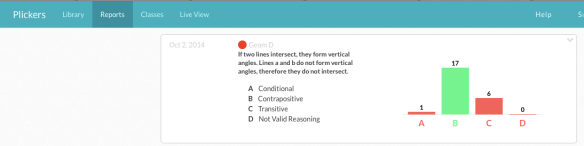
It also stores the data on their website so you have a record of correct and incorrect answers.  I know you think that I must be lying, but I am not.  These things are AMAZING.

Screen Shot 2014-10-04 at 1.08.13 PM

I decided to affix my students Plickers to the back of their INB with clear contact paper.  That way, they should always have them handy during class, and hopefully they won’t get destroyed!  I oriented them all differently (either A, B, C, or D facing up) on their notebooks so they couldn’t see how other students were holding up their notebooks to get a hint.  It’s so much fun for the students and for me!

I have been using it as a warm-up, to asses prior knowledge or expose them to a new topic that we will begin that day.  I think it would also be a great “Pre-Assessment” or “Exit Ticket” tool.

You can see below how other teachers are using them in class as well.  If you have an idea about how Plickers could be used, please put it in the comments.  Also, if you have blogged about Plickers, please post your link in the comments so that we can all get great new ideas!

Paper Airplanes for Measures of Central Tendencies

IMG_6886I got this amazing idea from Bruno Reddy, @MrReddyMaths.  Go and read his post here. I love his discussion about mean and deciding who should win!  When I saw his post I knew it would be fun.  I planned on using the data to calculate mean, median, and mode.  However, I did not realize how much mileage I would get out of this one activity!  I pretty much teach the entire data chapter using just the data from this one activity.

I have my students watch the “How to Make a Paper Airplane” video and give them the template.  I do not give them any instructions and do not allow them to help each other.  Following directions is always a skill I am trying to teach 6th graders.

After we make the airplanes, we get to fly them!  Of course, I make it a competition. And of course, I video it!

Everyone gets a partner, to help with measuring, and three attempts at the best flight!  Student’s whose planes fly backward get to record NEGATIVE flights.  All three flights are recorded and then entered into a Google Form.  For homework that night, they had to find the mean of their three flights.

Screen Shot 2014-03-23 at 6.55.00 PM

Line Plots and Scale:

I have students make a line plot out of all three entries.  This year, I only had 21 students, so this is 63 entries.  This is a great time to talk about scale.   I have them record their distances in inches, but then they quickly realize that it is a much better idea to make the line plot using feet.  We find the mean, median, and mode of our data using our line plot.

IMG_6762

Range:

Range is one of my favorites here, especially with the inclusion of the negative flights.  This year, our flights ranged from about -300″ to 600″.  Predictably, almost all students told me that the range was 300″.  Students love plugging values into formulas incorrectly.  To help correct this misunderstanding, I had my -300″ flight student and my 600″ flight student come to the front of the room.  I stood at the starting point (the edge of the blacktop for us, also known as 0) and had them stand where their respective planes had landed.  Students immediately not only saw that 300″ was way off, but they saw why.  This was a wonderful opportunity to show them that 600 – (-300) was indeed 900″, not 300″.  My analogy to help deepen understanding was, “You leave from Charlotte to fly to New York, but you have a layover in Atlanta first”!  Nothing is ever better than visual learning and real life examples.

Box Plots:

The next day we learned about box plots.  I project the line plot of our flight data and as a class we make it into a box plot.  They loved seeing that a box plot can helpfully catagorize  their data.  Outliers are visual here, as well as where 50% of their flights landed.  Next year I am going to take a picture of their airplanes laying on the blacktop to back this statistic up visually.

IMG_6761

I also had the students create a box plot of their mean flight data.  They wrote their mean flight length (in feet) on a sheet of 8×11.5 paper.  Then, they organized themselves into a human box and whiskers plot.  The students who were the lower and upper extremes, Q1, Q3, and median all held index cards with the name on them.  We also decided who was in our interquartile range.

Histograms:

The line plot looks very much like a bar graph.  After a very brief explanation about histograms, we turn our line graph into a histogram.  The students love seeing their data grouped and of course ask why we didn’t do this in the FIRST place instead of making the tedious line plot.  It’s all for the sake of learning.  (Insert evil teacher smile.)

Google Doc Data:

I shared the data with the students and we then all made bar graphs and histograms on Google Spreadsheets.  The students like the histograms better as it condensed the data into groups.  They also learned how to sort the data and find the mean using a formula.  Again, they love finding the mean using spreadsheet formulas, find it less “mean” than calculating it by hand, and call me a “mean” teacher for not showing them this in the first place!  Practice makes perfect.

Screen Shot 2014-03-23 at 6.50.33 PM

Global Math Webinar – March 4: Student Creativity in Math with Technology

Don’t miss Global Math this Tuesday night, March 4th, Student Creativity in Math with Technology. Rafranz Davis (@rafranzdavis) will be presenting.

Rafranz is an instructional technology specialist for a Dallas/Fort Worth area school district. As an advocate for passion-based learning, Rafranz uses her experience as a secondary math educator to help teachers integrate technology using innovative teaching strategies aimed at empowering students to be autonomous learners.


Visit the Global Math Page to reserve your spot!

Video Tutorial Project – A Student Favorite

Lights, camera, action!

Screen Shot 2014-01-13 at 9.11.50 PM

Every now and then I have my students watch an explanation (teaching) video online.  I sometimes do this as a review when I’m beginning a topic that they have studied before.  They always hate it.  They always complain.  So, I rarely assign them teaching videos to watch.  They really hated the last one I assigned.  Their complaining gave me the idea to have THEM make their own teaching videos – and to do it better!

The Video Tutorial Project took a week of class time (and that included watching everyone’s videos one day in class).  However, I did not give them a review day or a test for this unit, so it was only about 3 extra days.  In their written reflections, it was clear that my students LOVED this project.  And, their videos were impressive.  They were creative in their presentations and even added transitions, music, and even special effects.  My favorite video was a take off of Vi Hart’s videos.  There is no way I could have made a video this good, ever!

Screen Shot 2014-01-13 at 9.10.03 PM

I partnered the students into groups of 2, and let them pick their topic from our current unit.  They had to state and define their topic, then show three clearly worked out examples, increasing in level of difficulty with each example.  They could make the video anyway they wanted.  They all had to upload their video to YouTube.

I created a project planning Google document for them to follow, and distributed it using Doctopus.  I had them create the three examples problems for homework one evening and submit them on a GDoc form.  That way, I could check to make sure their examples were sufficient.  In class the next day, they made any necessary corrections and planned their video.  They had the next three days to record and edit their video (if they chose to edit it).  I gave no other homework this week so that students would have time to work at home on it if needed.

Watch all of their Video Tutorials Here

This project was worth the time invested and I will definitely do it again.  The students loved it (see their responses below).  We had a few challenges that I would like to address before assigning this again.  One was finding quiet places to record on campus (it was freezing that week so it was not very comfortable outside).  Another challenge was the partner issue.  Students could only work together at school because this was a partner project.  Also, the video editing (if they use iMovie) always falls on the shoulders of one of the partners, which I don’t like.  I have thought about having each student make their own video tutorial, but they have so much more fun working together.  Also, in their reflections all of my students but TWO would rather work with a partner.  They also would have liked more time, but they always tell me that.  They would work on a project for a month if I let them.  They are awesome.

Student Thoughts:  What did you like the BEST about the project?

  • I felt like it really helped me even because watching the video helped understand the concept better.
  • How we could add our own interesting twist.
  • The part about how you could add in a challenge problem.
  • I loved how you can create a tutorial in so many ways, like white board or like V Hart.
  • working with a partner how creative we got to be
  • THE FREEDOM
  • it was fun
  • All of it!!!
  • having fun with my friend
  • Recording 😀
  • The fact that we could put what we wanted into the video
  • Getting to use my tablet to draw math.
  • We had alot of freedom to make it however we wanted and everyone had a different video.
  • I thought it was very creative.
  • filming
  • working with partner
  • that we got to make a video
  • Working on whiteboards and working
  • partner work
  • Probably putting it all together
  • That is wasn’t just an ordinary project.
  • The filming part.
  • the creative freedom was fun
  • the filming
  • The recording
  • It was awesome to just be able to go out on our own and make our own tutorial.


Our Code.Org Coding Success – A Summary

Screen Shot 2013-12-17 at 12.43.19 PMLast week my students participated in the Hour of Code.  It was an overwhelming success!  They enjoyed it so much that they continue to code, and they continue to ask me everyday if we are going to code in class.  As soon as they have any extra work time in my class, they are coding!  With these amazing results, I am looking to the future.  I would love to plan lessons and projects with coding involved.  I only hope I have the time to prepare this for my students.  They deserve it.

After our Hour of Code, I surveyed my students to see if they liked coding (on a scale from 1 – 5), and if they would like to continue coding in class.  The results are below.  I have included some excerpts and  you can also read their responses in detail here.  They were emailing me their creations, so I created a “Coding Creations” wiki page where they could add things they have created (or continue to create).

Screen Shot 2013-12-17 at 12.31.13 PM Screen Shot 2013-12-17 at 12.30.54 PMScreen Shot 2013-12-17 at 12.31.04 PM

Quotes from students:

It was really fun to just type in all the stuff and have no clue how it was going to turn out. It was also really fun when I got home and had to figure out what was wrong in all the billion lines of code I had typed in class. After hours of work all I had needed to do was take out the commas in the character’s speech. Thanks to the Hour of Code I am ready to go back and add in more complicated things to my campaign. Computer programming is really fun, and I can’t wait to do some more.

It was interesting and pushed my mind further and gave a sense of power in my mind and keyboard

I love coding so much! I think it is so fun to watch the videos and learn how to code! I woke up at 4:30 two mornings ago to code, and at 5 the day before. I am obsessed.

I thought it was really cool how you type in numbers and words, and it is linked to a little picture. I loved how you could make the holiday cards on khan academy! It was so fun! I also loved how it seemed really hard at first, but after you got the hang of it, and memorized the basic codes, you could create complex pictures.

I think it is really fun to look at all the things we use computer programing for and how important it really is in modern society and then be able to learn to do it! Its AMAZING!

I loved computer programming because you got a head start for the future. This has made me want to do more computer programming in the future!

I did 5 because coding is fun and interactive. It may seem scary but there is a world of computer science out there and coding is one major part.

I LOVE TO CODE!!!! DO MORE!!

I also asked them, “What did you like best about coding?”.

I liked best about coding that I could just type some letters and numbers and make what I imagined come to life! It truly is amazing.

It was very cool how you really got to control your computer and that you could build anything you wanted to.

I liked that it really made you think.

What was so cool was that after you got the hang of it you were basically doing it by yourself, at your own speed, and what every you wanted to draw.

It let your creativity flow, you could make anything you wanted with no strict deadlines.

I like coding because it lets you express your self in a more complex way.

The multitudes of possibilities and how simple it really is.

The fact that i could create those things on a computer just by typing in stuff!

The challenge and the good feeling when your character does exactly what you planed for it to do.

Hour of Code = Amazing Success

I cannot say enough good things about the “Hour of Code” that my students participated in today.  When I showed them the intro film yesterday they were so excited about coding they begged for the website link.  I gave them code.org/learn.  Another teacher told me that they started working on it immediately in work time yesterday.  Multiple students told me they went home and worked on it last night, some for a couple of hours.

Today, they ran into my room before class even began and asked if they could start.  I was overwhelmed with their excitement and curiosity in coding.  They started with the code.org/learn tutorials but many of my students quickly moved on.  Some of them ended up on Tynker or Code Academy, but the majority landed on Khan Academy and learned to write Javascript on their own.  It was easy for me as all of the websites have video tutorials.  Students were working together and asking each other for help if they had questions or when they got stuck.  At one point, I had half of the classroom around one students computer until he told them to “go and sit down so he could think!”  I took some pictures and videos to share (see below).  If you watch the video clips, be sure to listen to all of the students brainstorming about their programming in the background.  I just noticed that when I watched the video again.  There definitely was a “electric math/computer” buzz from all of my students in the background!  Videos on YouTube!

I signed up on the code.org website but did not receive an email with instructions or a teacher code.  I later saw that I could have the students enter my email address on their code.org page, but by that time they were very involved and I didn’t want to interrupt them to have them put my email in.  Even though I would love to get a summary of what they accomplished it was not worth stopping them.  The whole point of the day was to get all of my students coding.  The mission was accomplished, as I’ve had several students email me the progress they have made tonight with the projects they are still working on!

Screen Shot 2013-12-10 at 10.26.53 PM

Screen Shot 2013-12-10 at 10.28.19 PM

I’m not sure how long these tutorials will be available, but I do intend to find a way to give students class time to learn coding in the future.  We have been inspired and I want to give them the opportunity to develop this skill and keep this excitement alive!

Videos on YouTube!

Participate in the “Hour of Code” for Computer Science Education Week

Screen Shot 2013-12-09 at 10.30.18 PM

I’m so excited about the “Hour of Code”.  And, after showing my students some of the promo videos today, they were excited too!  So excited that they begged me for the link so that they could start tonight.  Visit csedweek.org for all of the details!

The goal is to have 10 million students participate in coding this week.  Here is why you should do it with your students.

  1. It’s free.
  2. It’s easy (minimal teacher prep).  Code.org provides many self-guided online student tutorials for ages K-12.
  3. Kids LOVE it. I introduced it by showing my students the promo videos. My 7th grade students got so excited!  There are 1 minute5 minute, and 9 minute versions.
  4. You can use computers and other devices.  They also have suggestions for classes with only a few computers.  If you do not have computer access, they even have off-line activities.
  5. It’s great for their BRAINS.

After I gave them the link, students were already working on it today in their free time and at home tonight.  One student emailed me her certificate of participation after completing the first tutorial!

“This is so cool!  I did the angry birds/plants vs zombies and it was fun!”

Screen Shot 2013-12-09 at 10.23.32 PM

Here is an “Hour of Code” Walkthrough video for teachers.  I watched this first.  I am doing our hour tomorrow in class and will let you know if I have any tips.

Hour of Code Handout for Schools

Also, these stats will convince you!

Functions New-Tritional Lesson from Mathalicious

I have to give a shout out to Mathalicious lessons right now.  I’m impressed with the way the student sheets are structured.  The directions are very clear and accessible to students so they can get right to work without tons of questions or further explanation from me.  This allows me to walk around and observe so I can see where my students are and help the ones that are struggling.  The questions also progress in the lesson so that students use their previous work to make discoveries.  This is really tough to do when creating lessons.  Kudo guys!

Screen Shot 2013-10-30 at 11.59.14 AMI did the Mathalicious lesson New-tritional with my 7th grade students.  I started with the opening slide and had them notice and wonder for a few minutes to see what they know.  They immediately got that it took 54 minutes of running to burn off the 550 calories in a Big Mac.  After watching the video, we talked about the preview questions (which I love btw)!  What factors affect how many calories we burn, how many calories do they think are in a big mac meal, and how long do they think LaBron would have to play to burn off that whole meal (if he had actually gotten to eat it)?

We then did Act 1.  I stressed UNITS!!  My lesson focus was functions, not decimals so I let them use calculators.  If I did this lesson in 6th, my focus would have been decimals and I would have them calculate it by hand.  Even with the calculator students said, “There has to be a quicker way to do this.”  FORESHADOWING!

IMG_6079A great discussion about the commutative property of multiplication came up in question 3 as students multiplied in different orders and got the same answer.  Then, I went back to their “easier way” remark and gave them two minutes on my timer to silently think of a better way to do all of this work.  After two minutes they shared their strategies with each other and then we discussed them.  I had listened in (Five Practices) and picked groups of students to go in order from least to most algebraic.  Rounding the cal/min was a suggestion by a couple of students.  But others pointed out that is wasn’t very accurate.  Several students wanted to graph it, and finally, a few even said that we could write a function.  Bingo.

So, as they suggested, we started with a graph on Desmos.  We entered the weight, and then the cal/min of the activity.  In the 2nd class, instead of entering (125, 7.875) in the Desmos table,  125, (125)(0.063) so they could see the pattern without me having to re-write it on the board.  After entering in all of the basketball data, I connected the dots.  Of course they wanted to extend the line, but could not from just the table.  They knew they needed a function so I gave them two more minutes of silent time to just LOOK at the table and see if they discovered the pattern.  No lie, almost every student was able to write the function, for the win!

Screen Shot 2013-10-30 at 12.25.56 PM

When I typed the function in and the red line drew on top of our line segment there were gasps in the room.  Oh, how I love it when these magical moments happen in math class!  We then use the weights of student volunteers to see how many calories per minute they burned playing basketball.  We found it on the graph, but then I created a table from the function and they loved that even more!

IMG_6081The question “How many calories do you burn just sitting?” came up and another student exclaimed, “IT’S ON THE BACK!!”  A student commented that he didn’t even burn ONE calorie per minute by sitting!  Which made another student ask, “How much would you have to weigh to burn one calorie a minute sitting?”  I had them write the “sitting” function  f(w) = 0.009w.  Then, I wrote f(w)=1.  So that 1 = 0.009w and we just solved for w, then check the answer in our graph.  I love it when a week comes together this way!!

Bonus – Student Remarks:

  • That picture isn’t real food.  McDonalds has an artist make food sculptures that they photograph.  (Really? I had no idea)
  • Who is that old guy? (Larry Bird)
  • Oh yeah! I thought it was Clinton too! (After telling them of Elizabeth’s students.)
  • I bet LaBron burns more calories per minute than that playing basketball since this is an average.
  • How many calories do you burn sleeping (volleyball, jumping on the trampoline…)?
  • How many calories do you burn just sitting – OMG, It’s on the back!
  • How many calories do you burn thinking.
  • Thinking? That’s JUST sitting.

Thanks again Mathalicious for a great day!

How to Create a Math Class Wiki for Electronic Student Portfolios

After my post about Electronic Student Portfolios, I had many great questions in the comments asking for more details about how to start a wiki, or how I implement wiki’s in my classroom.  Wiki’s are great for classrooms because you can control who can edit, comment, and even view the pages.  You can make your classroom a private wiki that is only viewable by people that you invite.  My student’s pages are publicly viewable, but only members of my wiki can leave comments on the pages.

Screen Shot 2013-10-13 at 2.21.44 PM

To get started, you must first create your own wiki for your classroom.  I use pbworks for education.  I use the basic version, which is FREE!  They do have an option with additional features that costs $99 for a year.  But the free version has been enough for my classroom for the past four years, so it’s a great place to start.  Click here to sign up for your free classroom wiki from pbworks.

You will need to add each student in order for them to create their own page or even comment on the pages.  They will use their email address and create a password.  I wait to do this until I am ready for them to create their pages and they have all read my wiki guidelines, which I got from the amazing David Cox.  He’s way ahead of me with all things technology, so I just took a page from his book (thanks again David!).  To add your students to your class wiki you can invite them using their email or have them requests access.  Once added, they must be logged in with their email and password to edit or comment on the wiki.  They will lose this password, so I have them write the information on the cover of their math notebooks.

Creating their own wiki page is very fun for them to do, and I count it as a project grade.  I created instructions for my students to create their own wiki pages.  The instructions I give my students are step by step and I expect them to read and follow the directions carefully.  This can be challenging for middle school students at times.  To help them find the answers to their many questions when they are creating their wiki pages, I created a Google Drive Question Documents.

Screen Shot 2013-10-13 at 2.28.35 PMInstead of raising their hand and not working while they wait for me to get around to them, I have them type their question into this Question Document, under the step number that they have the question on.  This is important because this makes them read the question again.  I reply by typing onto the document.  Almost all of their questions are answered in the instructions so I usually instruct them to go back and carefully re-read the directions.

If you have never used a wiki before, I do not have a webinar or detailed instructions on how to use PBWorks.  I just learned through experimentation and trial and error.  However, I did find a free online tutorial made just for teachers that explains wikis using pbworks, so if you need more instructions, you could go there.  I haven’t watched all of it but it seems very thorough!  If you find a better instructional website, please feel free to add it to the comments.

Electronic Student Portfolios in Math Class

Explore the MTBoS – Mission #1 is in full swing now!  We have had over 150 bloggers post this week!  If you haven’t written your post yet, there is still time.  One of the blog topics this week is about “rich tasks”.  I am trying to incorporate more rich tasks into my classroom, so thank you to all of the great bloggers who posted about their rich tasks because this is very helpful to me!  If you haven’t been over there to read the blogs, you should go and read some now!

For this weeks mission, I decided to blog about something that makes my classroom distinctly mine.  One of the best things that I have my students do every year is to create their own math wiki page.  Each students wiki page is an electronic portfolio of their math projects and a place for them to showcase anything math related that they find.  Many students add funny math jokes and pictures to their pages.  Some students also put on math quizzes and extra hard problems that they create for other students to solve.  For many of them, it is their first exposure to “social media”.  They love reading and commenting on other students pages.  I give them class time to read other students pages, but they also read each others pages on the weekends and even over breaks.  They love being able to create their own page, and I love that they are spending so much time exploring more “mathy” things.  It is especially a big hit in 6th grade, when students are new to computers and technology and aren’t heavily into other social media sites yet.

My new students know about the math wiki pages from my older students and usually start asking when they will get to create their own math wiki page on the first day of school.  I love that there is such a positive buzz about it.  It’s great when students are really looking forward to an activity in math class.  This week my new 6th graders will finally get to create their pages!  We are all pretty excited and I can’t wait to see what my new student produce!

Check out some of the wiki pages my students have created in the past.

Math Wiki Pages