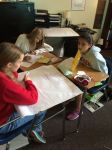
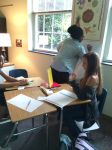
This was a fun and engaging activity that I think the students enjoyed as well. They really seemed to like drawing on the butcher block paper. Most of them were truly shocked at Barbie’s proportions. As we have all heard, her waist was very tiny. But we were surprised to see how short her arms were, how long her legs were, or how large her eyes were in her head! One of the most surprising finding was how small her FEET were. They were only about 5 inches long, which puts our life-sized, 5’7″ Barbie in a size 6 shoe – a CHILD’s 6 that is!
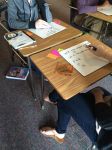
I got all of my inspiration and materials from Kathryn and Fawn. I let the students pick one student in their group to measure for the height comparison. Then the students used proportions to calculate Barbie’s scaled up measurements. After that, they traced the student on the chart paper, then traced life-sized Barbie’s measurements inside the student tracing.
Warning – it took longer for my students to draw on the chart paper than I anticipated, so leave extra time for that. But, I would definitely not skip this part. Calculating proportions isn’t very exciting until they realize they get to draw on giant sheets of butcher block paper! Also, they didn’t realize how small the proportions they calculated actually were until they compared it to their own traced figures. It brought proportionality to life!
Here are pictures of my students working today. I really enjoyed the activity, and I hope they did as well!
Measuring Student Height
Measuring Barbie
Calculating Proportions
Tracing the Student
Tracing in Barbie
GIANT Eyes
Finished Product
Finished Product
Edited: I did not have as much success with one of my classes today as the groups did not work as well together. If I repeat this activity, I will give a grade for it so each member is held accountable and works the entire time. Sigh. Days like these…
I only had about a week to cover transformations so I focused on translations and reflections, and then briefly covered dilations. I used coordinate changes, where (x,y) transformed to (x +2, y-1) or (-x,y) as I feel that will benefit them in later Algebra classes as well. Michael Pershan’s created an excellent Tool for Exploring Transformation Rules using Desmos that I love. I gave my students the link and let them play with it.
Then I had them take out the +5, and +8 so they only had (x,y).
I challenged them to make the house FATTER. It took them a while to figure out they had to multiply a number instead of add. After they were all able to make very fat houses asked them to make it skinner, taller, and shorter. After that, I asked if they thought they could turn it upside down. The students enjoyed making the house different sizes and moving it around. But the best benefit came days later when I only had to mention the house to remind them how to differentiate between the translations and dilations in future work.
Thanks to Fawn, my students actually cared about making the maximum sized box out of their 8.5″x10″ piece of graph paper. If you don’t do this, you should! It was very easy and great fun! You will need to go and read Fawn’s popcorn post because she has all of the great lesson details.
I went minimalist and only showed them a box I had made, and the squares I had cut out to make my box. I gave them a ruler, scissors, tape and ONE piece of graph paper. I told them they only got ONE piece of paper. They worked well and carefully. Most students chose to fold the sides in instead of cutting just in case they messed up. Love them.
I recently bought an Orville Redenbacher air popper so I brought that in to make the popcorn. Seriously, this is the best $22.49 I’ve spent in a long time even before I used it for a math lesson! I even brought in butter. One of the students took a picture of the air popper so she could buy one. It was pretty cool with all of the popping going on right in the back of the room. It smelled heavenly!
Once they made their box they measured it and entered the measurements and resulting volume on a Google Form. Then I filled up their box with popcorn! We ate while looking at the Google Form results and then I challenged them to find a general equation for an size cut. Several students came up with it pretty quickly and then I had them graph it in Desmos to show them how their maximum volume was also on the graph.
I really don’t know how people taught before the internet. Luckily, I don’t have to! I found some beautiful “end behavior” cards on the amazing Amy Gruen’s blog, “Square Root of Negative One Teach Math“. I doubled the set, adding the number of roots (real and imaginary), as well as direction and wanted to share them back out.
I passed them out to review end behavior and roots, but I wish I would have had these as a discovery lesson to introduce the concepts.
The amazing Amy is some sort of card sort savant. I also saw a Desmos card sort that I can’t wait to explore.
At my school, the first week back is called “WinTerm”. It is a week where all of the students get to take different classes. We have all day and half day classes, and some students even go on trips for the week.
I decided to teach a half day class on blogging. I created a blog for my students on how to blog with daily instructions. It has been such a fun week! My students have done an excellent job – and even ran through everything I wanted to teach them by Wednesday! So Thursday I had them read and comment on each other’s blogs. Today I am going to teach them how to REALLY use Twitter. Teenagers seem to use hashtags pretty randomly or mainly for sarcasm. I also introduced them to Code.org so they could understand the coding behind the blogs.
This slideshow requires JavaScript.
About mid-week we decided to do a group blog called “Study Songs” where songs and mnemonics are posted to help them study for school topics. We put a form on there so anyone reading the blog could submit their favorite mnemonic. Share it with your students so they can contribute too!
You could do blogging with a middle school class as well, probably beginning in 7th grade. I taught one of my 7th grade students how to blog last year because she had a great idea that needed to be shared! I have included her blog as well.
I was pleasantly surprised at how fast they went through the material I wanted to teach them this week. And I really love reading their blogs! I am learning about fitness, fashion, books I need to read, movies I need to watch, and food! I have included their blogs below so you can also see what students are capable of!
Check out our blogs!
Sara, Bloglet of Fire, My blog is about books, films, and various parts of nerd culture, and my opinions on everything.
Emily, Culture Shock, Going from being a senior in Charlotte to a freshman in Chicago and all of the advice gleaned and mistakes made along the way
Claudia, in a nutshell, My blog is about food allergies
Kate, The Crunch Chronicles, My blog is about my experiences making healthy recipes, or just recipes I like in general
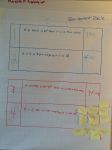
Help needed! I have quickly learned (the hard way) this year that Algebra 2 students need mini “refresher courses” of Algebra 1 before plunging into more advanced material. I gave my students a pretest and many of them also need a review on multiplying polynomials as well. I plan to review quadratic factoring for 2-3 days in my Algebra 2 class before I jump into factoring polynomials. Since this is a quick review of a section that takes at least a couple of weeks in Algebra 1, I would love some advice.
My review plan is this –
Day 1 – Eradicate FOIL – Multiply polynomials by using area method (boxes) and distributive property. Factor GCF’s.
Day 2 – Factor a = 1 and special cases.
Day 3 – Factor a > 1. Advice appreciated on methodology here.**
** What are your thoughts on factoring when a > 1 in Alg2 and above courses? The factor by grouping method is a sure thing, but is so much better than “guess and check” (the way I learned and used forever) that it worth the time? I don’t believe my students were taught this method in the past and I don’t know if teaching them now will a) take to long and b) totally confuse them since it is a more procedure heavy way of factoring. Plus, in Alg2 + how often is factoring by grouping going to be useful?
For those of you who have been there before, I would love any advice (or anything you have created).
I’m totally reducing the amount of time I spend on this next year. But I’m blogging out what I did just in case you teach it as well.
Things I liked (in order that I taught it):
Inductive and Deductive reasoning sort – I made a card sort with inductive and deductive reasoning examples. I had the kids sort the cards with zero information, then tell me what they felt was different about the two sets of cards. They did a great job! I’m not including my cards because I need to change them next year. I will only do words on both types of cards, and no patterns or numbers. A few students took inductive to mean “numbers” or patterns only, and deductive to mean “words”.
I need to spend more time turning statements into conditional statements.
It takes a few days but it is worth it! All students were very engaged the entire time.
DON’T LET THE STUDENTS WRITE THEIR OWN STATEMENTS. Use the ones Sam etc. wrote. You will thank me later.
It is “paper intensive” so make group packets before they come in to preserve your sanity.
I put the directions in a picture frame so students could see it more easily as it is a “directions intensive” activity. They did well and I love when they practice following directions.
After the posters were all finished, I had students do a “gallery walk” with post-its so they could make comments on other posters in case a student got the truth value incorrect. This was great!
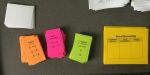
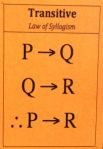
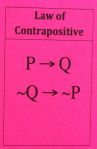
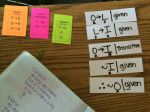
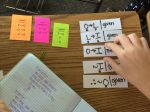
Symbolic Logic Proofs – I made cards for them to refer to. They used them often. We made “index card pockets” in their graph books to hold them. I loved these things!
Proof strips – I laminated card stock and we wrote on these to re-arrange the statements.
Post-it flags – I also let them use post-it flags to write the givens on so they could be easily rearranged.
I also combined this with Speed Dating for the win. I don’t think I can ever thank Kate enough for Speed Dating.
I did another sorting activity thanks to Pam Wilson’s intro to logic post. This went well! I let them sort on the floor if they wanted and then check their answers with another group.
I am really starting to like, even love, teaching Geometry. There, I said it. Hopefully I won’t lose my math card.
I am finding that Geometry problems are just one big puzzle. And I love puzzles! I am also inspired to see some students who were maybe not great Algebra students have success with Geometry. I have identified those students, and I plan to work with them one on one this year to strengthen their Algebra skills so they can keep their newfound engagement with mathematics going strong! It is so exciting to see these student’s perception of their own mathematics ability improving, and their attitudes about math changing!
I assigned two students per giant whiteboard with two different colored markers and one eraser. The two different colored markers were a fabulous idea. The students can color code things (so helpful in Geometry), and I could make sure both partners were equally participating. I’m not sure who gave this tip at Global Math but THANK YOU. As a bonus, the colored markers I found in my cabinet were scented. I didn’t realize how much this would thrill high school students. Some things that I think they will love they could care less about, but break out scented Expo markers and WATCH OUT because you will have some really happy teenagers. Who knew??
Back to parallel line proofs. I gave them the proof, but told them not to prove it yet. I told them to just draw the picture and label the GIVENS only. Then, I had them discuss with their partner how they knew the “prove” was true. For example, given that m<1 is 100 degrees, how did they know that m<8 was 80 degrees? Once they talked about it, I had them write down their thinking (steps) on their whiteboard. Then, they shared their giant whiteboards with their steps with the rest of the class.
They discovered:
There are many ways to do a single proof
Some ways can take many more steps
Some ways are equally as efficient as others, there is not one most efficient way
How to carefully explain their steps to the class so everyone would understand what they were doing to “prove” they knew it.
They do not like it when other people talk while they are presenting. This is great training for when I am talking! lol
After they shared, I modeled how to write down the proof steps, explaining that they have to SHOW why m<2 = 80 degrees, if m<1 is 100 degrees using substitution and angle subtraction.
After that, I gave them another proof, but let them do the steps and work on the proof before sharing with each other. The sharing is crucial, as it helped students see the difference ways each group solved the proof. My favorite part was how mad a student became when she realized she had taken TWO extra steps than another group to prove her statement. Now that is engagement! In fact, this activity produced some of the highest levels of engagement I have seen all year! Thanks again Bowman!!
The #MTBoS is a wonderful place. Sometimes the only problem is deciding which awesome activity I will do, since I don’t have time to do them all! Luckily, I had a block day, so I was able to use two great activities that I found, and even add one of my own.
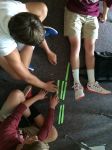
After reading Jessica’s post about “Dance, Dance, Transversal”, I knew I had to do it. As I desperately miss the high energy of middle schoolers, I am often trying to infuse some fun and spirit into my HS student’s day. I couldn’t wait to have them dance, but didn’t want to spend more than about 10 minutes dancing because we had a lot of work to do. However, since I was going to spend all of that time putting tape up the floor (and it turns out even more time taking it off – tip for you, use PAINTER’S TAPE, not regular masking tape), I wanted to see if I could use those lines for more than one activity. The result? A lighting round of Geometry Jeopardy!
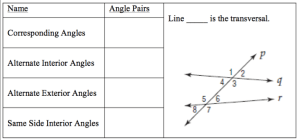
When the students came in, I instructed them to find a partner and have a seat on a set of lines on the floor. I gave each student the graphic organizer, and a post-it note. I then projected a similar set of lines on the board and asked them questions. They were to put their post-it note on the answer. Then we recorded the correct answer on the graphic organizer. For example,…
I loved this because students had to work together, each with one post-it, to decide not only what an “alternate interior angle” was, but which set to put their post-its on.
Angle pairs
Partner work
Kids loved sitting on the floor.
Photobomb
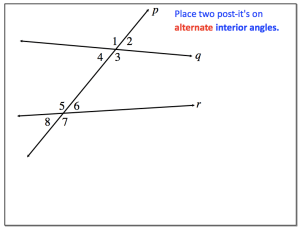
After this activity, we did a short round of “Dance, Dance Transversal”. After the partner post-it activity, the kids decided to dance with their partner first. So for alternate exterior angles, each student would stand on one angle. The game had been described as one person dancing while the other partner watched, but I think this worked out better because everyone was involved at the same time. Plus, it took more talking to decide where to step when each angle was “called”. Unfortunately, I was too involved in the action or I would have taken a video of this! It was great fun!
After learning the names of all of the angles made by a transversal, it was time to move on to parallel lines. I am trying to incorporate Geogebra, so I borrowed and adapted this lovely discovery activity from Tina Cardone. Of course I made it into a foldable! My instructions were adapted from the amazing Kate Nowak. I especially love her “teacher checkpoints”, where the students have to call me over to approve their work before moving on to the next step. This greatly helped to prevent students from going down the wrong path for too long, which sometimes happens with discovery lessons! For instance, many students didn’t “construct” parallel lines, they merely drew two lines that looked parallel. So, when students called me over I would move a line to ensure the other line moved parallel with it. Another checkpoint was measuring angles in Geogebra. This can be tricky, and pretty frustrating to the students. Seeing angles of 257 degrees are not going to help them understand which angles are congruent.
These activities seemed to work well, as two days later in class they all knew not only what the angle pairs were, but which ones and even when they were congruent. I did have to remind a few students that they are only congruent when the lines are parallel. Next year, I will be careful to make sure the tape lines on the floor do NOT look like parallel lines.
Here are my advisee’s making sure there was room to dance on the lines. They are so much fun.


 Thanks to Fawn, my students actually cared about making the maximum sized box out of their 8.5″x10″ piece of graph paper. If you don’t do this, you should! It was very easy and great fun! You will need to


 Laila will give an overview of what the CPM curriculum entails and discuss some of her students’ favorite lessons thus far.


 After reading