Desmos Activities for Distance Learning

I’m still on “Spring Break”, and we do not start online learning at my school until March 26th. I am glad that my school community has this time to process, as I am not ready to think about online learning yet. I don’t know what online learning looks like for my school yet. And I think that some students may crave the structure, but that others will need compassion, and space.

I do not want to assess my students. I am sure that they are feeling the stress of uncertainty just as I am, and I do not want to add to their stress. I want kids to feel connected to each other, especially if they need that. I would also like to mix up my students online learning, so they they are not just watching online videos and doing practice problems. I would love for their online learning to be creative, and not too monotonous.

Screen Shot 2020-03-17 at 3.32.41 PM.pngI plan on using Desmos Activity Builders that connect students to each other, like Point Collector, and especially activities that contain Gallery Slides. A Desmos Gallery is a screen at the end of an activity where students get to create their own challenge for their classmates. And then their classmates pick each others challenges to solve.  I feel that doing these galleries will not only allow students to be creative, but also feel connected to other students. I plan on encouraging them to reach out to the “creator” while working on a challenge, or providing feedback after.

I’ve created a Collection of Desmos Activity Builders that contain gallery slides here. I am sure there are more I am not aware of! Please let me know and I will add to this collection. I would love to know how it works out for your students, and the ways that you are incorporating galley slides, and all Desmos in general, in your online learning. Enjoy!

Screen Shot 2020-03-17 at 3.25.22 PM.png


How to Easily Make Instructional Videos on iPad or Mac

Last month, I started making short videos for my students after one of my precalculus students told me that she would LOVE it if I would make math help videos. I have made short videos for our test review, new topics we have gone over, and answered homework questions. I am still very new, and still learning. But my students have really appreciated it. They tell me that they like to hear me explain it again, instead of searching for and then watching other math videos when they need help (or missed a day of school).

Then, at our last faculty meeting, our head of school told us that if we were not comfortable getting in front of a screen for students, either recording ourselves or going online for instruction, then we needed to get comfortable, just in case. Immediately, my teacher bff texted me…IMG_735B135651F7-1.jpeg

So, I made a video to teach her how to make instructional videos. Again, I am still very new! I know there are much better videos and methods out there. But the good news is that I have been able to make many videos, very easily, and in short time. What I do is not difficult, or complicated. And that is important to me as I do not have much time to spare (#TeacherTired). So, I thought other tired, overworked teachers may appreciate knowing how I make videos quickly and easily.

Mac: I use QuickTime to screen record on a Mac. QuickTime is already on all Macs so this is very easy to do right away! I only use this method when I want to screen share and record my voice. There is no writing. This would be great if you wanted to give a lecture using your Mac and a PowerPoint.  (Example below).

iPad: I use my iPad and the app ExplainEdu for almost all videos that I make. I love this app because I can add pictures, videos, pdfs, included clipart, and even a browser  to screen share. I can write, hi-light, use a laser pointer, and draw shapes that the app will recognize! The app is $13.99, but was worth it as there are no other hidden charges. The Explain Everything website has video tutorials that are probably much better than mine! 🙂  

My school does not use Google Classroom, so I save the videos onto my iPad, because then I can upload them to Google Drive or YouTube. If you want to upload to YouTube you just need to create a free account.

My iPad Video Recording Method:

  • I do much of the work in advance of recording, to cut down on recording time.
  • I take screen shots of each example problem I want to explain to my students.
  • I put each problem on it’s own page.
  • I annotate by adding formulas we will need or things I want to hi-light.
  • When I am all finished, I record. This is where I work out the problems for my students.
  • I upload my videos to YouTube
  • I add the videos to playlists I have created.
  • Sometimes I will embed the videos into PowerSchool on the “Math Help” page.

How I Make Instructional Videos

Using QuickTime to Screen Record on a Mac

Example of a screen cast I made for my students, How Desmos Can Play the Sound of Your Graph!

Again, as I am new, I would LOVE tips from anyone who is much better at this than me!  If you have an app you love, please include it as well! 

Law of Sines and Cosines and Desmos Geometry!

I do Standards Based Grading and I don’t grade homework. All of my students grades are based on assessments. Recently I have been giving my students graded assignments. I try to design them so that they take the students through different types of problems and have a reflection. I let them work with each other, check their answers with Desmos, and come to see me for help if needed. I’ve only done two this year, but many of my students really liked them. They said that the stress was lower than on assessments because they could ask me questions. They also liked working with each other and being able to check their work. After the graded assignment, I usually give another assessment, and I have noticed a large improvement in grades, especially from students who usually score lower on assessments. Students tell me that the graded assignments really helped them learn and understand the topic better.

This chapter I gave them a graded assignment on vectors and the law of sines and cosines. They have already learned the ambiguous case  with the law of sines, and some students seemed to be relying on memory, but I could tell they really didn’t understand what was going on. So I decided to have them finish constructing a couple of triangles, and to take them through the ambiguous case with law of cosines.

Today I gave them an activity builder where they had to do an ASS triangle with the law of cosines, and helped them learn how to use the Desmos Geometry tool. I want them to be able to check their answers on their graded assignment with Desmos Geometry. I haven’t used Desmos Geometry with students yet, but it was really fun today! Plus,  I love that they learned a new tool.

If you use this, I would LOVE feedback!  🙂

Law of Cosines AB using Desmos Geometry– I loved how some kids actually made the ONE triangle instead of the two separate ones.

Triangles Graded Assignment, docx

Triangles Graded Assignment pdf

Standards Based Grading – Guest Post by Taylor Gibson

This post is written Taylor Gibson, who teaches at the North Carolina School of Science and Mathematics. Taylor has been using standards based grading (SBG) in his classroom for several years, and shares his SBG system with other teachers every year at the Teaching Contemporary Mathematics (TCM) conference held by his school.

Two years ago, I attended TCM and heard Taylor Gibson talk about how he has implemented SBG into his classroom. I had been curious about SBG for years, and even did a blended SBG model in my middle school classes at my previous school. Hearing Taylor explain it so clearly and enthusiastically was inspiring. When Julia Finneyfrock and I decided to try SBG the following year, it was his model that we started with. So, instead of trying to explain his method, I asked Taylor to guest blog for me. Thank you Taylor!

Standards Based Grading – by Taylor Gibson

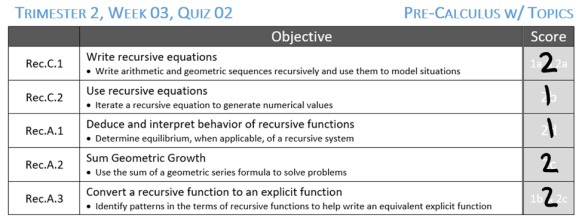
Standards-Based Grading has dramatically changed the way I use assessment in my classroom over the last few years. Simply put, it allows your assessments to be both for learning and of learning. Instead of assigning points for each problem and determining how many points a student earns for their response, you instead align standards (or learning objectives) to each problem and decide holistically if students have demonstrated mastery in each standard based on their response. I’ve chosen to report mastery on a scale of 0, 1, or 2 with 0 being no mastery demonstrated, 1 representing partial mastery, and 2 representing complete mastery. While numbers are used to report a student’s level of mastery, these are not meant to be totaled to determine a score for each assessment. Instead, a student receives a small cover sheet with a score for each standard, as shown below:

SBG1

The light white numbers in the scoring column indicate what problem (or parts of a problem) I will look at to make a decision on mastery. Once score, it will look like: 

SBG2

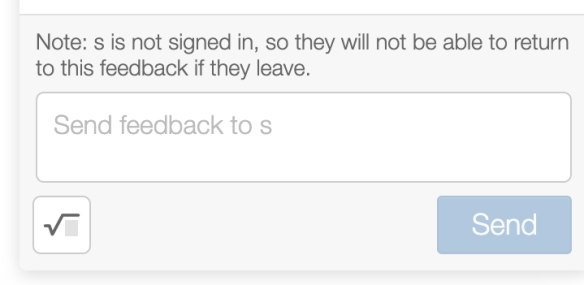
This level of feedback provides students with feedback specific enough for them to look at just the cover sheet and know precisely which topics they need to work on.

This aspect alone of changing your reporting system would be a great help to students. However, the biggest impact for students is that these scores can change over time if they demonstrate a different level of mastery later on in the course. For example, in the include score sheet the student earned a score of 1 on the standard Rec.C.2. Should the student reassess on this standard, either on another in-class assessment or an out of class reassessment, their new score replaces the 1 in the gradebook. Likewise, if a student earns a 1 on the standard Rec.A.3, it would replace the 2 they earned on this assessment. This mechanism results in the following positive outcomes for students:

  • Any score earned on an individual assessment doesn’t need to be permanent since students can request a reassessment in the future. I’ve found this greatly reduces student stress and anxiety when taking an assessment. No more tears when a quiz or test isn’t going well!
  • It provides an incentive for students to take their feedback from early assessments and seek additional support to remediate their understanding in areas in which they haven’t yet demonstrated mastery (encourages a growth mindset)
  • It provides an incentive for students to really learn material, not just cram for a test, since they know that a learning standard may be on a future assessment in a week or two, and that getting a 2 today doesn’t exempt you from having to show mastery again to keep your 2.

At the end of a grading term you can decide how to combine the mastery scores in each standard and convert to a course-ending grade.

Some common methods:

  • The % of standards mastered (score of 2) is the grade in the course. For the above example, the student mastered 11 standards out of 12, resulting in a 92% in the course.
  • Average the standard scores together and score to a percentage. In this example, eleven scores of 2 and one score of 1 yields an average score of 1.92 or 96% in the course.
  • Create your own cut scores for each letter grade based either on number of standards mastered or average score on all standards

Moving to a system like this requires repeated explanation of the system to: students, parents, colleagues, and administrators, but I firmly believe the benefits far outweigh those costs. It’s a complex and nuanced process to get right, but there’s a lot of flexibility for implementation to make it work for your students, classroom, and school.

Taylor was also gracious enough to share the Powerpoint from his presentation, as well as standards in different content areas with us. As in most areas of education, standards are an ever evolving process, and are often tweaked from year to year.

Recommended Further Reading in Standards-Based Grading:

About the Author

Taylor GibsonTaylor is the Dean of Mathematics at the North Carolina School of Science and Mathematics. He’s previously taught in Dallas, TX, and Atlanta, GA before moving to Durham, NC. Taylor’s professional interests are in standards-based grading and interdisciplinary coursework between mathematics and computer science. Outside of the classroom you’ll find him running with the cross-country teams in the extreme North Carolina humidity.
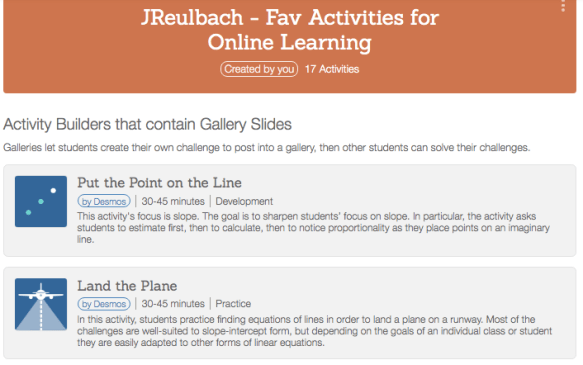
 

How Do You Use Rocketbooks?

This spring at NCTM, the amazing Bill Thill introduced me to his Rocketbook Wave notebook. I loved what he was doing with it in class, and ordered it right away! But of course I haven’t had time to play with it until now.

My initial thoughts for using the Rocketbook were pretty simple, I want to upload solutions to problem sets into a shared folder for my students. This morning I tweeted out for more ideas, and Mr.Brennan sent me a fantastic Rocketbook Hacks video from the Sons of Technology.  After watching their video, I am bubbling over with ideas!

My students told me that uploading their work to PowerSchool was a pain, so I love the idea of using the printable Rocketbook pages to help make this easier for them. Maybe I can give each student a template to keep in their binders, so they can easily upload any of their work. I would love for students to be able to upload their One Sheets to share with other students.

I did the 40 Hour Teacher Workweek club this past year and loved how it helped me get organized.  I plan on making my “To Do” lists in sharpie on the first few pages of my Rocketbook.

I would love to hear how other math educators are using this in their classroom before I get started creating folders. Please comment to let me know how you are using Rocketbook! Thanks in advance!

Julie Reulbach

Pascal’s Triangle, Patterns, and Binomial Expansion

Today the CPM lesson in my Algebra 2 book started with a lesson from my MS past, Pascals Triangle. I only have two new lessons of the year left before our final assessment and then exam review begins. So I gave them extra time to discover the patterns and then play with Pascals Triangle after their quiz. They’ve had a stressful week (it is May!) and the quiz was tough, so coloring was definitely the right call! Some kids got so into coloring they didn’t even care about the patterns. I didn’t mind at all because they were coloring one of the patterns!

After discovering and then sharing the pattens by groups, we moved on to the main part of the CPM lesson, discovering binomial expansion within the Triangle, then using substitution to extend it to more then (a + b)^n.

I don’t know if it was the all of the cool patterns or the coloring, but my students really got into this lesson today. We usually work in groups in my class, but a couple of students got really involved in the math and extended what they were learning. I usually bring students back to group work when they go off on a tangent, but they were so excited that I just let them go! I’m so glad I did bc they developed these beautiful ideas. Drake was so proud of his that he labeled it and left it for the rest of my classes to see!

My students also created beautiful triangles. Next year I am going to make the Triangle larger so they can see the Sierpinski pattern even more through their own coloring. We decided to do a Pascal’s triangle photo shoot in a couple of my classes. What an amazing way to end the week.

Learn to Code Desmos Activity Builders!

Yes, you can code Desmos Activity Builder’s to personalize them and make them do more! If you have been creating Activity Builders but want them to do more, coding is the answer! The coding in Desmos is called Computation Layer (CL). I highly recommend trying it out, as it’s great fun to program a small bit of code and then see it work in Desmos!

jaychow

Jay Chow

By far the best resource I have seen out there to learn CL is Jay Chow’s blog post, A Fool’s Guide to Learning CL.  Jay is a Desmos Fellow and CL extraordinaire, plus I think he’s probably the nicest person I have every met. His blog post includes step by step instructions, hints, fun scavenger hunts, and even webinars to help you learn CL.  Bonus – he’s holding 4 more Webinars starting in February!

screen shot 2019-01-27 at 11.30.07 am

MrChowMath.com

Jay also has many other gems on his blog (I’m so thrilled he’s blogging), like several Breakout! Desmos activities! Thanks for all of your great work Jay!  🙂

Bloggers, 2019

This year I taught a Blogging 101 class at my school during “Winterm”, which is a week of special interest classes or trips between the fall and spring semesters. Here are the blogs my students created if you are interested in reading them. Happy reading!

Winterm Blog

img_4854

  • Isabella – mylifeasizzy, Blog about just a personal blog; just for fun 🙂
  • Maddie – Maddie’s Take, Blog about food, fashion, makeup
  • Aidan – Aidan Finn, Blog about cars
  • Ethan – The Robotics Brainstorm, Blog about Robotics new and design concepts
  • Miles – MilesBlogs, Blog about I wants to blog about sports events that are going on in the country.
  • Jake – Artist’s Block, Blog about It will be away for me to showcase my art portfolio and blog about different techniques you use when drawing, whether it be digital or physical
  • Erin – Erin Kohlhepp, Blog about not sure
  • Amaya – Whatever World, Blog about Going through life and saying whatever to the negativities the world throws at me!
  • Jahnavi – Jahnavi Dotes on Totes, Blog about How plastic effects our planet
  • Anshul – Anshul’s Blog, Blog about Everything

View original post 109 more words

First Week Back to School Survival Guide

This is just a survival guide for me to read next year, so I will know what to do, and how to best survive, the first weeks back to school.

Week 0 – Preservice

Waking up early and putting on real clothes is the worst.  But it’s SUPER fun being back and seeing everyone!  It is a busy, busy week.  Do not expect to get too much school work done (or any work at all done) this week.

Week 1 – STUDENTS!

Even though I’ve been teaching forever, I still freak out the night before school officially starts.  I don’t know why, maybe it is the fear of the unknown?  Maybe it is just the death of my summer schedule – getting plenty of sleep, working out whenever I want, shopping, vacations, TV, and reading books?  Most likely I’ve just forgotten how much I love what I do.

Day 1 – It just takes ONE class period for me to be in love (ok, obsessed) with teaching again.  The drama of the night before is forgotten and I look back at myself and laugh (shake my head).  But I’m glad it happened this way, because hopefully I can console my friends who feel this same way and will go back later this month.  Feeling this way before the first day is REAL and TERRIFYING.  But it is also ok, and will hopefully dissolve instantly on Day 1.

The word for this week is SURVIVAL, and maybe DON’T FEEL GUILTY.  No, you will not have time to plan a lesson at school so you will have to do it at night.  Yes, you will have to meet with someone every planning period.  NO, don’t you DARE try to make dinner (I did, it was a disaster).  Take out is your best friend forever.  Don’t feel guilty if you can’t exercise, AT ALL.  It will come later, but not this week.  YES, it is OK to go to bed at 7PM.  As much as you love it, you can’t go from Netflix to 100% people contact without some casualties.  You WILL be crying on Thursday night.  Your family will not understand.  That is ok, because it is normal.  The priority this week is SELF-CARE, or rather, self-preservation. You can’t do ALL of the things this week.

Weekend Interlude – SLEEP, exercise, and be nice to your family so they don’t worry too much about you after your Thursday night breakdown.  Take Saturday off so you will feel human again.  Take Saturday off. Take Saturday off. Take Saturday off.  Sunday, plan like crazy and pick out your clothes for the week (thanks Meg).  Go to bed early.

You’ve got this. You LOVE this, and that will get you through. ❤️

Julie