Introduction to Transformations Marbleslides!

I just made my first Marbleslides in Desmos!  It was incredibly easy, and the students said it was a really fun way to learn.

This Marbleslides activity introduces students to transformation form and lets them practice moving graphs around with Marbleslides (SUCCESS!!) using the new parent graphs they just learned.  My students know transformation form with linears, y = a(x – h) + k, but have not moved any other graphs around yet.  (For this activity I used the absolute value, quadratic, square root, and cube root functions.)

I have two goals with Desmos this year.

  1. Shorten my Desmos Activity Builders, so that I have time in class to practice with the students outside of Desmos.
  2. Make worksheets to accompany my Desmos Activity Builders, so the students can have notes to look back on.

I felt this activity accomplished both, and my students really seemed to enjoy it.  I have provided the activity and the worksheet for you to try.  I would love feedback!

Desmos Introduction to Transformations Marbleslides

trans-ms-des

screen-shot-2016-10-22-at-9-52-32-am

QR Code Stations – Function Notation

We have been working on “building” equations to solve for x , literal equations and an introduction to functions.  After flooding my students with function notation, I decided we needed a day to practice.  One of my favorite ways to let students practice is stations.  I love station work because they allow students to move around the room AND work with different people all period.  I let them pick their partners to start, and I put 2 sets of partners at each station.  They can work with all of the people at their table.  However, I strongly encourage them to work at their own pace.  If they finish and want to move on, or want to stay longer it’s all ok.  Students that work at about the same pace usually end up with each other. No students are bored waiting on others to finish, and I can spend time working with students who have question.  I rove from station to station answer questions so I feel like I get to connect with individuals as I help them.  It is a great day all around!

I still use the clear picture frames to display the problems, but now I put the answers online, so all students can easily see them and have them for later.  This also allows students who may not finish (or who are absent) to access all of the questions and solutions later.  Students can access the answers by scanning a QR code at each station.  Many of my kids have a scan app, but I found out yesterday (from the students of course) that Snapchat has a QR reader.  Here are my function stations.  The QR codes will be active until the end of the 16-17 school year.


screen-shot-2016-10-02-at-2-48-02-pm


Algebra 2 Transformations Unit, Starring Desmos Teacher Activities

I teach out of the Discovering Algebra Book.  Last year I tried out the order in the book, and it was disastrous.  The book introduces a new parent graph with each transformation. That did not go well with my students.  It was confusion city.  This year, I went back to what I know.  I taught parent graphs first, then transformations.  Finally, they learned how to write equations given the graph with dilations.  Whew.

Glenn’s convinced me to use the “transformation form” (AKA h,k form) last year in Geometry.  That was a great start with my students in Algebra 2, as we were able to use it right away starting with linears.  I can’t tell you how many problems using the transformation form solves, and how relieved kids eventually are, not to be married to the y-interecept.  Many times, they aren’t given the y-intercept, so y=mx+b is used much more sparingly this year.  It takes my newbies a while, but they get it.  Why kill yourself trying to find where this stinking graph crosses the y-axis when you could put pick ANY point out on the line.

85dda-11850303_153438328335826_1353010797_nThanks to Glenn, I knew to use transformation form from the start.  Thanks to Meg, I had a ton of material to draw from.  And thanks to Desmos, the kids could actually discover transformations ON THEIR OWN.  Disclaimer.  Even with all of this wonderful discovery and conceptual learning, students NEED you to summarize what they have learned with them, and then keep them practicing their new discoveries to cement those discoveries into their brains.  With conceptual learning, many times they are pretty sure they understand what is going on, but they really love when you affirm that.  Also, some kids have a tough time getting there, so a thorough summary at the end helps everyone.

When I taught transformations years ago, I would teach parent graphs, then give them a list of transformation rules to learn and apply.  It was pretty dry and procedural.  Now, I have moved to Desmos, where the students play with graphs to learn what the transformations do without ever seeing any “rules”.  It is awesome, and it sticks.

Screen Shot 2015-10-28 at 8.31.28 PMI still teach parent graphs first and function notation first, along with domain, range and  interval notation.  I actually teach them with the material in the previous chapter so they can know the parent graphs cold before we even start looking at transformations.  After they learn the parent graphs, they study transformations and reflections and then move to dilations.  Oh, those dilations.  My students work with computers and each other for the entire unit.  I also give them handouts so they can take notes and graph as they go along.  I didn’t give them the “transformation rules” until one of the last days.

All of my transformation files are in this box folder.  And the Desmos Teacher Activities are linked below.  You can’t use my activities, but you can’t copy Desmos activities YET for editing.  I am sure that is coming soon.  You will see a vocabulary sheet referred to in the Desmo’s activities.  To start every chapter, I give my students a vocabulary sheet.  They takes notes on it and then most of their important terms are together in the same place.  The vocab sheet is also in the box.

Desmos Teacher Activities – Transformations

  1. Transformations – Shifts and Reflections
  2. Transformations – Dilations
  3. Dilations again (as a short review in-class lesson)
  4. Transformation – Extra practice

Discovery Fosters Engagement in the Classroom with Factoring

Last month I accidentally had a chance to “experiment” on 3 different classes of students.  It reminded me of graduate school when we would devise a new method for one “test” class to try out while the “control” class was taught a more traditional lesson.  It was “Swap Day” at our school.  Swap Day is a half day when the 8th graders visit high school for a day.  They take the place of the current 9th graders who spend their half day visiting Middle School.

Since I teach primarily 9th graders, I had a day full of brand new students that I have never taught, or even met.  We only had 30 minutes per class.  I didn’t want to bore them to death with the, “This is what you will do in High School Geometry” next year.  I also didn’t want to stand up there and talk all period to students who did not know me.  So, I decided to tackle simple factoring with them, since most of them are currenlty in Algebra 1.  They have not gotten to factoring yet in Algebra 1 so I had beautiful, blank factoring slates to work with!

Screen Shot 2015-02-14 at 7.46.49 PM

I started out with one of my most favorite factoring puzzles.  It is the x-box puzzle.  I give them zero instructions, just a puzzle sheet.  As students start to test numbers, I walk around and let them know if they have figured out the pattern or not.  This becomes a great game for them, as they all try to “get” the pattern first.  The fervor usually intensifies as soon as one student figures it out.  Other students redouble their efforts.  Usually towards the end, students who took the longest to figure it out are the proudest and give me high fives.  It’s always GREAT fun!

Except for one class.  I gave out the puzzle then went into the hallway to look for more 8th graders, as my class was half full.  When I came back in I said, “Has anyone figured out the pattern!?!”  “We ALL have.”  WHAT?  It had only been a few minutes.  It usually takes about 10 minutes for everyone to get the pattern!  Then, a student admitted, “Well, she figured out the pattern and told us all what it was.”  Oh.  I watched them sitting there, dutifully filling out the rest of the boxes.  No excitement was born, and the rest of the class was much more flat than the ones before.

Two classes had to work to figure out “the math” on their own.  They had to push their brains to discover the pattern and apply it to subsequent problems to see if they were right.  They were competitive with each other and themselves.  They were excited and engaged.  But the one class was told how to do the pattern did not get the challenge of discovering it on their own.  Once they were “instructed” what to do, they mechanically filled out the tables of numbers like they would any other worksheet.  I did not do this on purpose, but I am glad that it happened.  Because it reminded me how important discovery and challenge is to engagement.

Back to factoring.

Screen Shot 2015-02-15 at 8.43.42 AMSince I only had 30 minutes, I did not attack factoring by grouping like I usually do.  I went with “number sense” and made the factoring using the boxes a “puzzle” just like the x-puzzles.  I created a Factor Boxes Dry Erase Template and slipped it into a dry erase sleeve.  (Everything is more entertaining with dry-erase).  I gave them a couple of area models.  Then I let them multiply binomials with the boxes.  Then I filled the boxes in and they had to find the factors.  Finally, I gave them a trinomial and they had to figure out what to put in the remaining two boxes and thus find the factors.  At each stage the students caught on very quickly.  And they seemed to really enjoy the challenge.

I wish that I had the time to design engaging discovery lessons like this everyday.  Days that are missing discovery are flat for me, and even torturously boring as a teacher.  NEVER underestimate the effect on engagement of true discovery in a classroom.

Function Transformation Discoveries using Desmos

Calling all teachers to help me make these better!

Screen Shot 2014-10-04 at 11.40.52 AMThis summer at Twitter Math Camp, Glenn (@gwaddellnvhs) and Jonathan (@rawrdimus) showed us how they lead students through all of the functions in Algebra 2.  Basically, they put all of the equations into (h,k) form.  Fortunately, the book I am using this year, “Discovering Advanced Algebra” does basically the same thing.  Since it is a “discovery” book, they have some good ideas that I have been able to modify and made into INB (Interactive Notebook) form.  Never fear, this just means it’s a worksheet that you fold in half.

Screen Shot 2014-10-04 at 11.58.29 AM
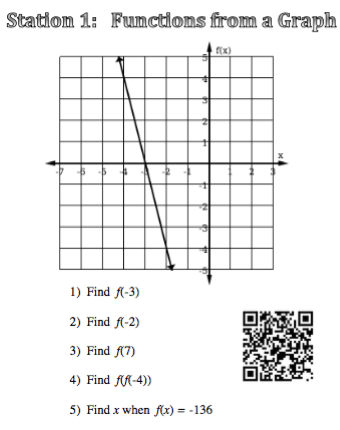
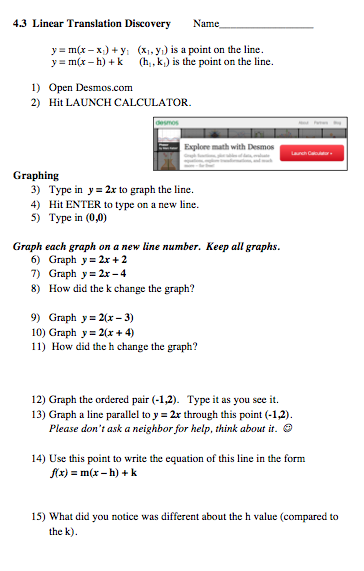
The first discovery was also my students first introduction to graphing with Desmos on their own.  Of course they have seen me use Desmos multiple times by now since Desmos has all of those great example graphs in their side bar!

Here is how I progressed through discovery for linears, quadratics, square root, and absolute value.  The Box files with the word docs are at the end.

  • Horizontal and Vertical Shifts
    • Linear Equations (first time with Desmos)
    • Screen Shot 2014-10-04 at 12.15.08 PM
    • Quadratic Equations
    • Screen Shot 2014-10-04 at 12.14.30 PM
  • Reflections with the square root function
  • Dilations with the absolute value function – these last two are combined into one.  I would love any suggestions on this – before Monday.  I know, I’m asking for too much here! 🙂
  • Screen Shot 2014-10-04 at 12.11.32 PM

Also included is a “Transformations Parent Graph” foldable that I made to sum it up.  I kind of hate this one, and would love suggestions here for sure!  Should I add dilations?  Why is it so ugly?  What else do I need to add?  I need help here for sure.

Screen Shot 2014-10-04 at 12.10.56 PM

Algebra 2 Function Transformation Discoveries

Please note:  I did not make all of these discoveries from “scratch”.  I created some of them.  But some were inspired by the textbook I am using this year, “Discovering Advanced Algebra” and some were created by my amazing co-teacher.  I then adapted all of them for INB (Interactive Notebook) form.

Barbie Bungee iMovies – Line of Best Fit

The Barbie Bungee iMovies are finally finished!  Barbie Bungee was my favorite activity of all times.  There is nothing more exciting then seeing seeing if your Barbie is going to come crashing to the ground.  The students learned so much and we ALL had a blast!

I’m not an iMovie expert, but I learned much more about it by making this movie.  The text moves way too fast – I wanted stationary text but it kept cutting it off.  My students told me they would help me with that.  They are only 12 years old, but much better at iMovie than I am!  I love them.

I told them they could make an iMovie if they wanted to – totally optional.  Three students made movies.  I have put them all (and the movie I made) here.  Enjoy!!

Zoe G, Ellie M, Trent A  (iMovie created by Zoe G)


My iMovie

iMovie by Ellie M.

Turning Words into Math – Graphic Organizer

I made this graphic organizer to help my students quickly (and visually) reference the math symbols that words often translate into.  I had them glue it onto the back cover of their notebooks for easy reference.  The words are not centered on the page so that the paper can be easily cut down to fit onto spiral bound notebook pages.  The PDF file is below.  Thanks!  🙂

Words Into Math Graphic Organizer and Word Bank

Creative Commons License
I Speak Math Materials by Julie Reulbach is licensed under a Creative Commons Attribution-NonCommercial 3.0 Unported License.
Based on a work at https://ispeakmath.wordpress.com.

Writing Linear Equations from Word Problems – Foldable

6th and 7th grade students do not like to write equations for word problems. They just want to scratch out some calculations and give me their answer. Often, their answer is correct, but I would love for them to develop how to write an equation from a word problem at this level.

I made this four step foldable to visually slow them down, and illustrate the steps they need to take when writing an equation from a word problem. The students caught on very easily when I did this in class with them. For the first time, they seemed to realize that they needed to complete several steps in order to solve a word problem (by writing an equation). I emphasized the importance of the equation.

20120319-181658.jpg

20120319-181711.jpg

20120319-181720.jpg

This is the example that I wrote on the board to illustrate how to write an equation and solve it.

20120319-181726.jpg

PDF and Word File of the Foldable.

Sorry for the upside down picture!  I was trying to post using my iPad.  That app needs work!